Technitium DNS Server v13 adds support for Catalog Zones [RFC 9432] that allows automatic provisioning of DNS zones to one or more secondary
name servers. This implementation has support for Primary, Stub, and
Conditional Forwarder zones such that their respective secondary zones are
automatically created by the catalog zone setup, greatly reducing the manual
task that a DNS administrator would have to perform otherwise.
Catalog zones are just normal, regular DNS zones which use various DNS records to codify information related to the member zones hosted on the primary name server. A Secondary Catalog zone, that needs to be manually created once on each participating secondary name server, uses standard Zone Transfer (AXFR) or Incremental Zone Transfer (IXFR) mechanisms to sync the records from the Catalog zone. The Secondary Catalog zone processes this coded information in the synced DNS records to add/remove zones on the secondary name server as well as update their properties. The current implementation supports Query Access and Zone Transfer options to be automatically synced to all secondaries.
Now that you know what Catalog zones are capable of, lets see how you can
create and configure them to use on your setup. For this, you will need to
have two DNS server instances such that one of them will be your primary DNS
server, where you will create primary zones, and the second DNS server
instance will be your secondary DNS server which will host the corresponding
secondary zones.
Creating Catalog Zone
To create a catalog zone, you will first need to login to the primary DNS server's admin web console and navigate to the Zone section. Use the Add Zone button in the Zones section and enter a domain name to be used for identifying the catalog zone, select the type as Catalog Zone, and click on Add button to create the catalog zone.
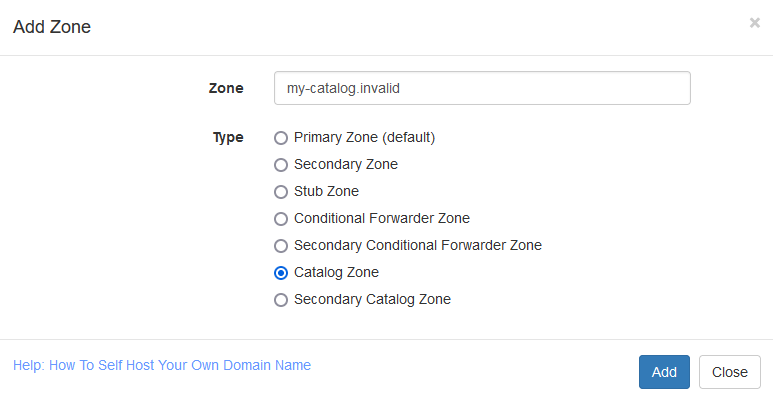
|
| Creating Catalog Zone |
Note that the catalog zone's domain name must be unique such that it does not block resolution of any valid domain name. It is recommended to use a subdomain name of the domain name that you already own to avoid any conflicts or use extensions like ".invalid" which will ensure that the catalog zone name does not conflict with any other domain name.
Once the catalog zone is added, you will need to go to the Zone Options, and configure the Zone Transfer and Notify sections to allow secondary DNS servers to sync their secondary zones and get notified whenever updates are available. But before that, you need to configure a TSIG key to secure the zone transfer between the servers so as to prevent an attacker from taking over your secondary DNS servers.
To configure TSIG key, go to the Settings > TSIG section, click on the Add button to add a row, enter a Key Name to identify the key, enter a Shared Secret (or keep it empty to auto generate), select HMAC-SHA256 Algorithm, and click on Save Settings button. You can use the same catalog zone's domain name as the key name to make it easier to identify it later.
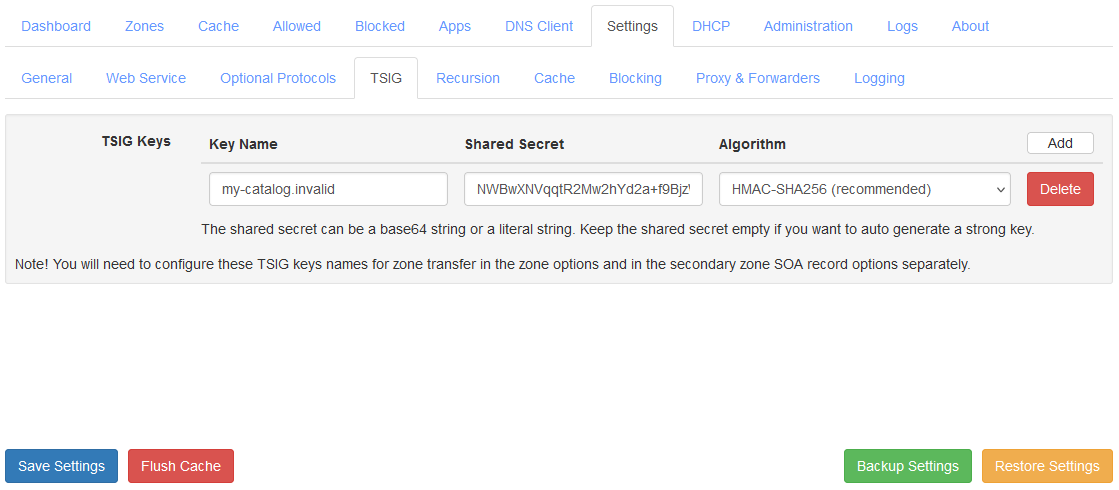
|
| Catalog Zone TSIG Configuration |
Once the TSIG key is configured, you can switch back to the Zones section and open the Zone Options dialog for configuring the Zone Transfer and Notify options.

|
| Catalog Zone Transfer Options |
To configure Zone Transfer option, you will need to select the "Use Specified Network Access Control List (ACL)" option and enter the IP addresses of all the secondary DNS servers one below the other. Scroll a bit below and specify the Zone Transfer TSIG Key Names option with the name of the TSIG key that was configured earlier. You can use the Quick Add drop down to select the TSIG key name.
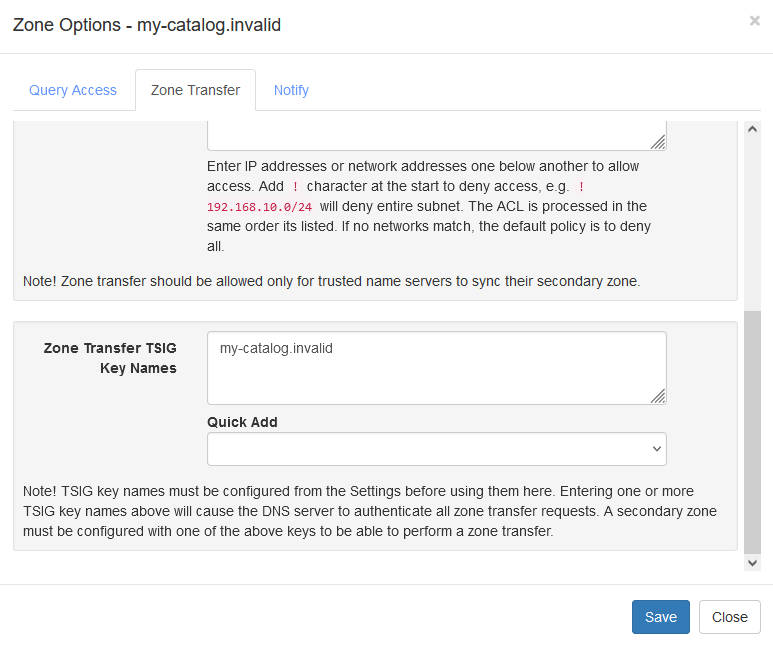
|
| Catalog Zone Transfer TSIG Key Names |
To configure Notify option, select the "Specified Name Servers" option and enter the IP addresses of all the secondary DNS servers one below the other. Once done, click on the Save button to complete the configuration for the catalog zone.
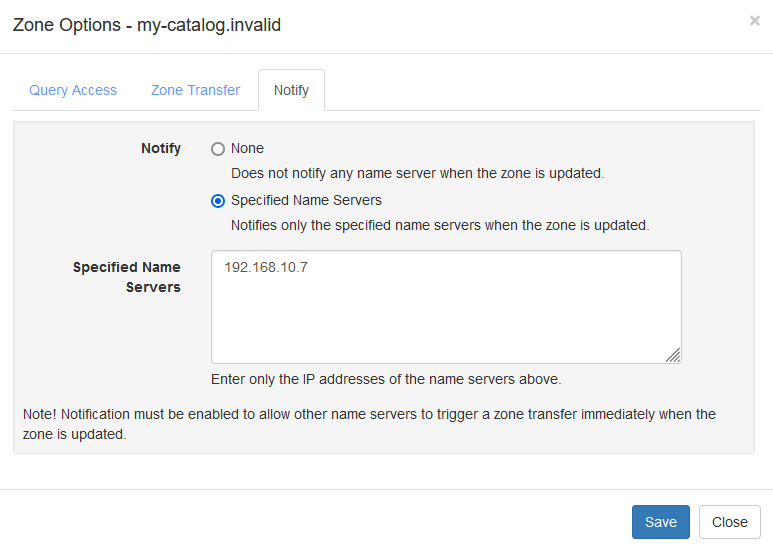
|
| Catalog Zone Notify Options |
Creating Secondary Catalog Zone
Login to the secondary DNS server's admin web console and navigate to the
Settings > TSIG section to configure the same TSIG key in your secondary
DNS server. To do that, click on the Add button to add a row, enter the same
Key Name that was used in the primary DNS server's TSIG config, enter the same
Shared Secret, select the same Algorithm, and click on Save Settings
button.
Now switch to the Zones section, use the Add Zone button and enter the same domain name you had used to create the Catalog zone in your primary DNS server. Select the type as Secondary Catalog Zone, enter the IP address of the primary DNS server for the Primary Name Server Addresses option, keep the default Zone Transfer Protocol, select the TSIG Key Name that was added earlier, and click on Add button to create the secondary catalog zone.
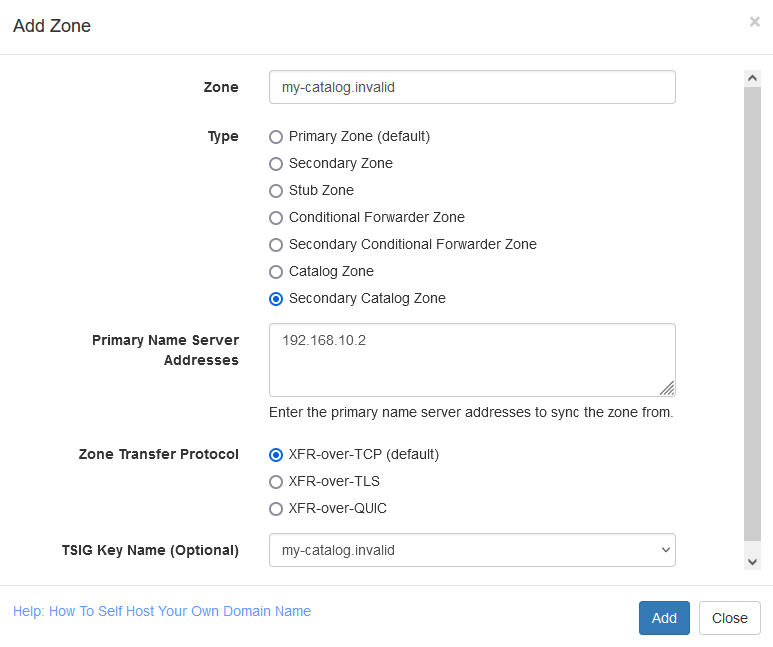
|
| Create Secondary Catalog Zone |
Once the Secondary Catalog zone is added, it will automatically sync up the zone by performing zone transfer and process the zone records to apply the available properties. If you see the zone's status as Expired, just click on the refresh icon next to the zone's domain name to refresh it. If the zone is still Expired after a few minutes, go to the Logs > View Logs section and click on the latest log file to see if there were any errors logged. The error message, if any, will help to understand what went wrong and help you fix the issue.
If you have more than one secondary DNS server, repeat the steps described
above to add Secondary Catalog zone for all of them.
Adding Member Zones
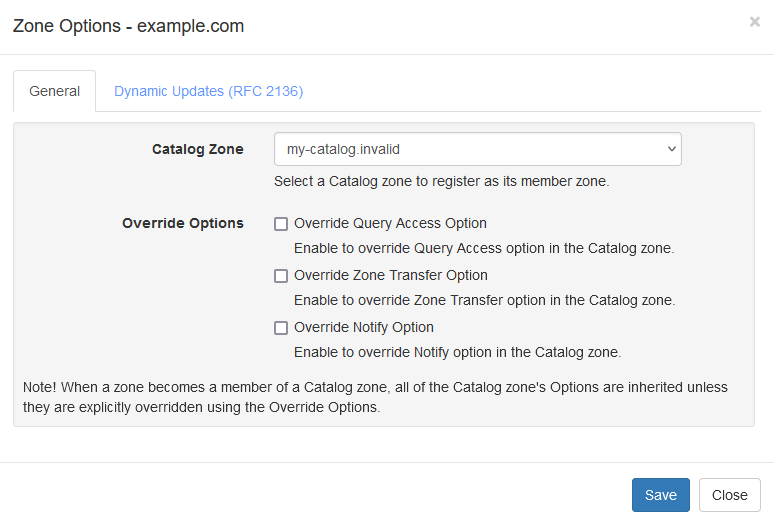
With the setup of Catalog zone and the Secondary Catalog zone, the main configuration is complete and you can now add any existing or new zones as member zones in the catalog. To add an existing zone, switch to your primary DNS server's admin web console and open Zone Option dialog for the primary zone that you wish to add. You will find a new General section in there with an option to select a catalog zone. Use the drop down option in there to select the catalog zone that you had created earlier and click Save button. The primary zone has now become a member zone of the catalog and DNS records codifying this information will get automatically added into the selected catalog zone. Within roughly 10 seconds, these records would get synced to the Secondary Catalog zone and get processed to automatically add a Secondary zone on the secondary DNS server.
|
| Adding Existing Zone As Catalog Member Zone |
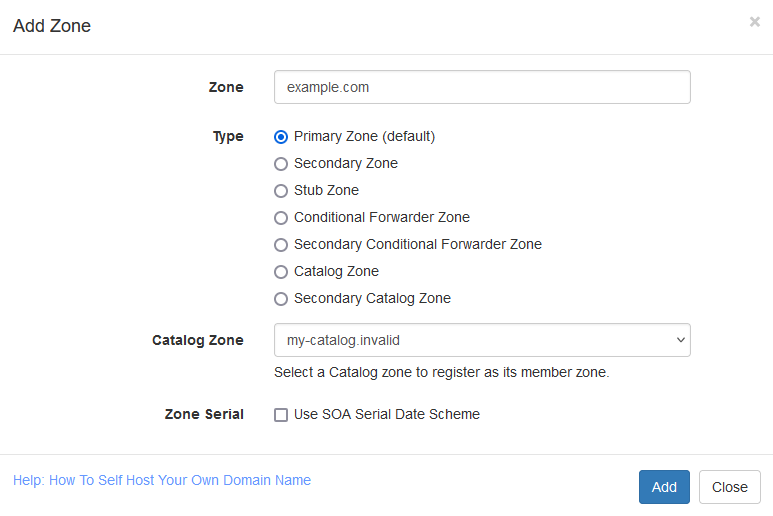
While adding a new zone, you will now see an option to select a Catalog zone to add the new zone as its member zone. When a catalog zone is selected, the newly added zone immediately becomes a member zone and within a few seconds, its corresponding secondary zone would get automatically provisioned in your secondary DNS server.
|
| Adding New Zone As Catalog Member Zone |
When you disable or delete a primary zone that is a member of Catalog zone, it would automatically cause its corresponding secondary zone to be removed from the secondary DNS servers too. If you enable the primary zone back, then the corresponding secondary zone would again get automatically provisioned. Deleting the catalog zone itself would have no effect on the secondary DNS servers however, deleting the Secondary Catalog zone would remove all the secondary zones that were provisioned via it.
Along with Primary zones, a catalog zone can similarly be used with Stub and Conditional Forwarder zones. The Secondary Catalog zone would create a Stub zone itself as a "secondary" in the secondary DNS server, and it would create a Secondary Forwarder zone as a secondary for the Conditional Forwarder zone.
Member zones of a catalog automatically use all the options that are configured in the catalog zone's Zone Options dialog. It may be required that a certain primary zone needs to use some custom options. In that case, the Zone Options dialog has override options to allow overriding them with specific configuration which will automatically reflect in its respective secondary zone. However, using a common configuration provided in the Catalog zone is convenient to manage and if needed, you can have two or more catalog zones with different sets of configuration that are commonly required.
Conclusion
Catalog zones are powerful tools to automate zone provisioning across two or more secondary name servers. They also make it easier to update properties of zones from a single place minimizing chances of misconfiguration across the setup. Its possible to organize your setup by creating multiple catalog zones as per required common configuration and also allows you to provision zones on different set of secondary DNS servers per catalog zone.
Technitium DNS Server is planned to have full clustering support in upcoming major updates that would allow managing two or more DNS server instances from a single admin web console. The catalog zones feature added in this current update is an important part and will be used to provide support for the upcoming full clustering feature.
If you have any comments or queries, do let me know in the comments section below or send an email to support@technitium.com.
Greetings from Brazil Shreyas Zare. We are fascinated by your work. In this new v13 version, can you help laypeople how to make the DNS server authoritative? I added a secondary root zone with dns roots. I waited to download the DNS, everything was fine. But I didn't have an authoritative resolution, is there any additional step, besides what I did?
ReplyDeleteThanks for asking. The DNS server is already authoritative for the zones hosted with it. If you have added secondary root zone then it will answer authoritative for queries. Your question is not very clear so if this does not answer it then please describe it in details.
DeleteHi everyone! One moment is unclear for me (network administration is not my scope). I had created Catalog Zone "mydomain.local". Should I name nested primary zones as "subdomain1" and "subdomain2", or "subdomain1.mydomain.local" and "subdomain2.mydomain.local"? I need nslookup return all names as "PCName.subdomainX.mydomain.local".
ReplyDeleteThanks for asking. The name of your catalog zone is totally unrelated to any of the primary member zones in it. You can use any domain name for your catalog zone and add any your primary zones to it as you wish.
Deleteawesome feature. It's working well for me.
ReplyDeleteDo I need to create NS and glue records for secondary name servers if using catalog zones?
ReplyDeleteThe catalog zones feature only does automatic provisioning for your secondary zones. That is, if you create a new primary zone, a secondary zone for it gets created automatically on your secondary DNS servers that has the Secondary Catalog zone configured.
DeleteThe records you have in your primary zones get replicated automatically. But, you will need to manually create an NS record in your primary zone which points to your secondary DNS server. The next major update will support Clustering feature and if you have it configured then NS records for each node in the cluster will get automatically added to your primary zone.
Regarding glue records, you will need to add those manually from your domain name registrar's web panel.
Does this create a situation where the primary dns server has to be online for any new information to get created? It seems like this is setting up only a one-way sync: primary -> secondary... but if I want the DNS servers to be truly redundant then I need the ability to also create (for example) new CNAME records against the secondary and have it sync back to the primary when it comes back online... is this possible or is this what's coming in the larger clustering support you speak of toward the end of the blog post?
ReplyDeleteThanks for asking. With DNS, you can edit the zone only at the primary DNS server and its not possible to do so at the secondary zone. This is usually how it works for any type of DNS setup.
DeleteSome vendors use a backend database server for storing zones which can be used by multiple DNS servers. In such case, updating the database entries directly is possible but such a setup is not common.
The clustering feature that is under development will be using catalog zones itself for the hosted zones so it will remain the same with it. With clustering, there will be option available to promote a secondary server to a primary server when the primary fails or needs to be decommissioned. So, in that case, it will be much easier to manage the entire setup.
Greetings Shreyas Zare, thanks for your work on this DNS Server! I have configured a catolg zone as your blog post suggests. But in my primary (and subsequently) in my secondary Technitium DNS server I already have 200 zones configured and synched (more or less). I've tried to add some of these zones to the catalog zone in the primary server but in the secondary server the grey catalog zone name under the added zone doesn't appear. Am I missing something? Thanks!
ReplyDeleteThanks for asking. The Secondary Catalog zone will not remove/modify an existing zone thus you see no change for the existing secondary zone. You need to manually delete the existing secondary zone and then use the "Resync" button in the Secondary Catalog zone so that it resyncs all catalog records and creates the required secondary zones automatically.
DeleteThanks! It's working
DeleteYou're welcome!
DeleteSorry to bother you again, but I noticed another thing.. In the catalog zone options, under the tab "query acess" it's selected "allow (default)". Is it a good idea to change it to "Use Specified Network Access Control List (ACL)" and add the IP address of the secondary to the allowed, to achieve a better security?
DeleteThanks for asking. The Zone Options for Catalog zone apply to all member zones such that you can manage these parameters for all member zones from a single place. The Catalog zone itself is not queryable, that is, it does not answer standard queries sent for its domain name.
DeleteThank you again for your answer and your work.
Delete