Saturday, November 26, 2022

Technitium DNS Server v10 Released!

I am happy to announce the release of Technitium DNS Server v10, a cross-platform, free, open source software that can be used by anyone, be it a novice or an expert user. It features an easy to use web based GUI and works with default config that allows the server to run out-of-the-box.

Download the latest update for Windows, Linux, macOS, or Raspberry Pi!

Technitium DNS Server
Technitium DNS Server v10

This is a major release that now runs on .NET 7 Runtime and adds a lot of features like Dynamic Updates Security Policy, DANE TLSA record, SSHFP record, EDNS Client Subnet, DNS64, and more.

Read the change log to know more details about this latest update.

Any comment or feedback is really appreciated and helps a lot in adding new features and fixing bugs. Send your feedback or support requests to support@technitium.com. You can also post on /r/technitium on Reddit for community support. For any feature request or reporting bugs, create an issue on GitHub.

The DNS Server source code is available under GNU General Public Licence (GPL) v3 on GitHub.

You can make a contribution to the project by becoming a Patron and help in developing new software, updates and adding more features possible. Become a Patron now!

Saturday, September 24, 2022

Technitium DNS Server v9 Released!

I am happy to announce the release of Technitium DNS Server v9, a cross-platform, free, open source software that can be used by anyone, be it a novice or an expert user. It features an easy to use web based GUI and works with default config that allows the server to run out-of-the-box.

This is a major release that adds multi-user role based access support.

Download the latest update for Windows, Linux, macOS, or Raspberry Pi!

Technitium DNS Server
Technitium DNS Server v9

Read the change log to know more details about this latest update.

Any comment or feedback is really appreciated and helps a lot in adding new features and fixing bugs. Send your feedback or support requests to support@technitium.com. You can also post on /r/technitium on Reddit for community support. For any feature request or reporting bugs, create an issue on GitHub.

The DNS Server source code is available under GNU General Public Licence (GPL) v3 on GitHub.

You can make a contribution to the project by becoming a Patron and help in developing new software, updates and adding more features possible. Become a Patron now!

Sunday, July 10, 2022

How To Secure Your Domain Name With DNSSEC

The Domain Name System Security Extension (DNSSEC) is an extension that allows you to digitally sign DNS records for your domain name. This allows a DNS client that supports DNSSEC validation to authenticate all the DNS responses for your domain name. It is important to note that DNSSEC provides authentication but does not encrypt the data in transit. Thus it is possible for an attacker on the network to log the DNSSEC requests and responses, or block them all together.

This blog post is a continuation of the previous blog post that was about self hosting your own domain name. In this blog post we will take a look at how you can sign your self hosted domain name with DNSSEC. But first lets find out why you should sign your domain name and understand how DNSSEC validation works.

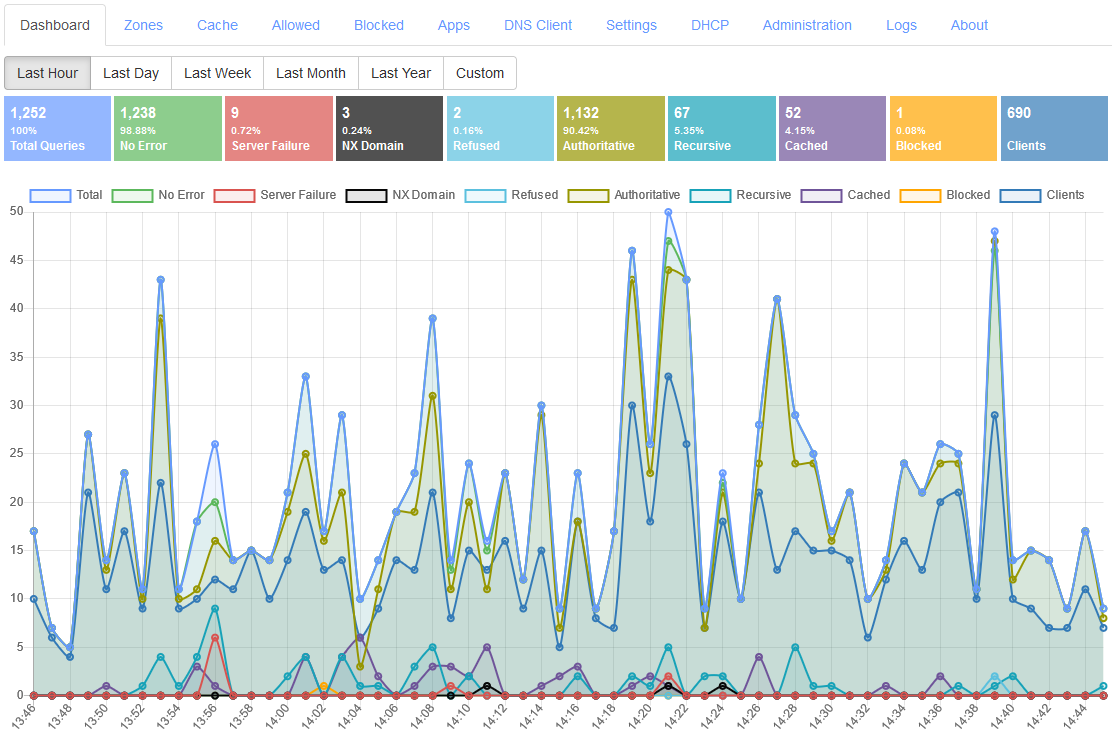
Technitium DNS Server Supports Both DNSSEC Signing And Validation

Why You Should Sign You Domain Name

This is a genuine question that comes up in everyone's mind considering that SSL/TLS certificates already protect your website from Man In The Middle (MiTM) attacks and also protect the data being transferred by encrypting it. 

Even then, there are many reasons to consider to sign your domain name, some of which are:

  • Most SSL/TLS certificates are issued based on domain name validation. This means an unsigned domain name that is vulnerable to spoofing, will allow an attacker to get a certificate issued for your domain name by spoofing responses to a Certificate Authority (CA) DNS requests during the certificate issue process. A signed domain name will prevent such attacks.
  • The CAA records that are used to indicate which CAs are authorized to issue a certificate for your domain name are secured when the domain name is signed. This prevents an attacker to get a certificate issued from unauthorized CAs by spoofing CAA responses.
  • Your HTTPS website is protected with SSL/TLS certificate since a user entering the domain name in the web browser that is matched with the certificate's subject. But your emails are not protected in that same manner. When an email is sent, the sender's mail server queries for MX records for your domain name to find out the mail servers that receive email for your domain name. If the domain name is unsigned, its possible to spoof the MX response to redirect your email to an attacker controlled mail server which then forwards the emails to your mail servers keeping a copy of all your emails.
  • Even when your domain name is signed, its possible for an attacker on the network path to downgrade a SMTP session such that STARTTLS fails causing your email to be transmitted in clear text. A signed domain name that has DANE configured for your mail servers will prevent such attacks.
  • DNS is also used to prove ownership of the domain name for many services that is usually done by publishing a TXT record with a given challenge string. An attacker can abuse such processes by spoofing TXT responses for unsigned domain name to prove ownership.
  • A signed domain name also protects itself from cache poisoning attacks on recursive resolvers that do DNSSEC validation. 

Signing your domain name thus protects your domain name as an owner from abuse or hijacks which otherwise are possible for an attacker with enough resources and motivation. Take a look at this video that explains how an attacker was able to performed an attack to hijack IMAP service that DNSSEC would have prevented.

How Does DNSSEC Validation Work?

DNSSEC uses public key cryptography to digitally sign the DNS records. The most commonly used algorithm is RSA but new algorithms like ECDSA, Ed25519, and Ed448 are also standardized.

The primary name server that hosts a DNSSEC signed zone has access to the secret private key being used to sign the zone while the corresponding public key is available as public DNSKEY record in the zone. Each record set in the zone, which is a group of records of same type, including the DNSKEY record set, is signed using the private key and the signature is stored as a RRSIG record. So, a DNS client can validate each record set by requesting for the DNSKEY records and use the public key from them to verify the signature in the RRSIG records in the DNS response.

To make sure that the DNSKEY records received by the DNS client itself are genuine, the DNS client has to fetch another set of DS (delegation signer) records from the parent zone. The DS record contains the hash of the DNSKEY record which the DNS client can use to validate the DNSKEY record that it has received. The DNSKEY which has a corresponding DS record published in the parent zone has a flag called Secure Entry Point (SEP) set to indicate that. The DS records from the parent zone itself are signed which the DNS client has to again validate against the DNSKEY records from the parent zone. The DNS client is configured with either DS records or DNSKEY records of the ROOT zone which acts as the trust anchor allowing the DNS client to validate a domain name and its parent zones up to the ROOT zone. This is called a chain of trust where having a trusted ROOT zone's DS records is sufficient for a DNS client to validate all domain names recursively.

The RRSIG records allow the DNS client to validate an existing record set but how does the signed zone prove that the requested type of record set or the sub domain name itself does not exists? This problem is solved using the NSEC (next secure) records which adds a level of complexity to DNSSEC. The signed zone has NSEC records for each sub domain names including the zone's apex and contains the domain name of the next NSEC record forming a kind of linked list that is sorted in an alphabetic order (canonical order). The last NSEC record contains the domain name of the first NSEC record. The NSEC records also lists the type of record sets that exist for that particular sub domain name. A DNS client using the NSEC records received for a request can validate if the requested domain does not exists (NXDOMAIN) or if there are no records for the requested type (NODATA).

The problem with the NSEC records, used to prove non-existence of domain name or a record type, is that the zone's entire structure gets published and thus anyone can use a technique called "zone walking" to list out all the sub domain names and all the record types for the zone. This is since NSEC records form a linked list and so the first NSEC record at the zone apex tells you the sub domain name of the next NSEC record which can be similarly followed to know all the sub domain names in that zone. This can be a problem if a zone contains private or internal records that must not be publicly disclosed. To fix this issue, another record type called NSEC3 (next secure 3) was introduced that uses hashing technique to mask the domain names that are visible in NSEC records. The NSEC3 record is also a kind of linked list similar to NSEC that can be used in similar way to prove non-existence of a domain or record set but the hashing of domain names in it adds another layer of complexity. The NSEC3 record makes it difficult for an attacker to perform "zone walking" but is not impossible for someone determined with resources to spare.

Configuration

The most common way to configure a signed zone is to have two sets of key pairs called Key Signing Key (KSK) and Zone Signing Key (ZSK). The KSK is the key pair for which a DS record is added in the parent zone and is used to sign only the DNSKEY records in the zone. While ZSK is the key pair that is used to sign all other types of records in the zone. This scheme of key management allows you to replace the ZSK (rollover the key) without the need to update any DS record at the parent zone making it possible to frequently change the ZSK. This also allows the private keys corresponding to KSK to be stored securely in a Hardware Security Module (HSM) which is only used when key rollover operation is required to be performed preventing KSK from being compromised. Technitium DNS Server implements KSK and ZSK keys to sign a zone but does not yet support HSM and thus all the private keys are stored in the zone file itself.

The most common reason for a signed domain name to fail validation and thus become inaccessible to users of validating DNS resolvers is misconfiguration caused during key rollover. The DNS records are highly cached at all levels. This means a record that has been deleted from the zone can still exists in caches of recursive resolvers, DNS proxies, OS, and even applications like web browsers. This makes it error prone to perform DNSSEC operations without help of proper tooling. The DNSSEC implementation done in Technitium DNS Server ensures that its easy and error free to configure and maintain a signed zone.

There are a few minimum requirements that you must check before proceeding to sign your zone:

  1. Check whether your Top Level Domain (TLD) is itself signed. You can only sign your zone if the parent zone too is signed. To check this, you can use the DNS Client tool to query for the TLD domain name with type set to DS. For example, if you domain is example.com, you should query for com as the domain name with type as DS. If you see one or more DS records in the answer section of the response then it means your TLD is signed and you can thus sign your zone.
  2. Make sure your zone does not use any proprietary ANAME or APP records. This is since those records generate a dynamic response which is not supported by the DNSSEC implementation. If you have any such records for a sub domain name then create another zone for the sub domain name for these type of records which will allow you to sign your main domain name independently. This ensures that your zone is signed except for those dynamic type of records in the sub domain zone.
  3. Check that all of your secondary name servers support DNSSEC. If you chose to use NSEC3 as the non-existence proof for your zone then make sure that NSEC3 too is supported by your secondary name servers.

Once you have confirmed all of the above requirements, you can proceed to sign your zone.

Signing Your Primary Zone

Proceed with the the steps below to sign your zone:

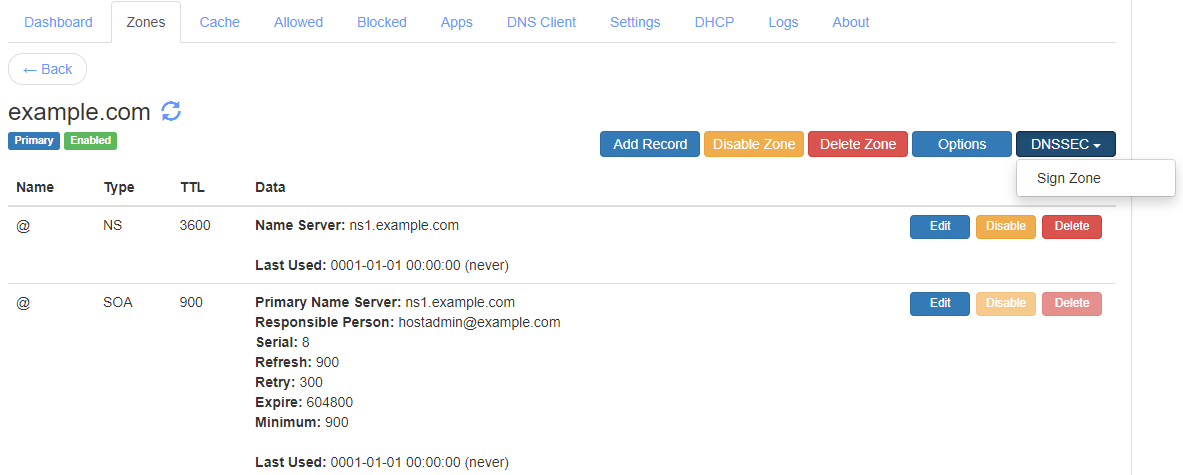
  1. Login to the DNS web console, go to the Zones section and click on the Edit button for your primary zone.
  2. In the zone view, click on the DNSSEC button at the top right corner to get a drop down menu. Click on the Sign Zone menu item to get the Sign Zone dialog box.

    The Primary Zone DNSSEC Drop Down Menu
  3. In the Sign Zone dialog box, select the recommended ECDSA algorithm as the DNSKEY algorithm and P256 as the ECDSA Curve.

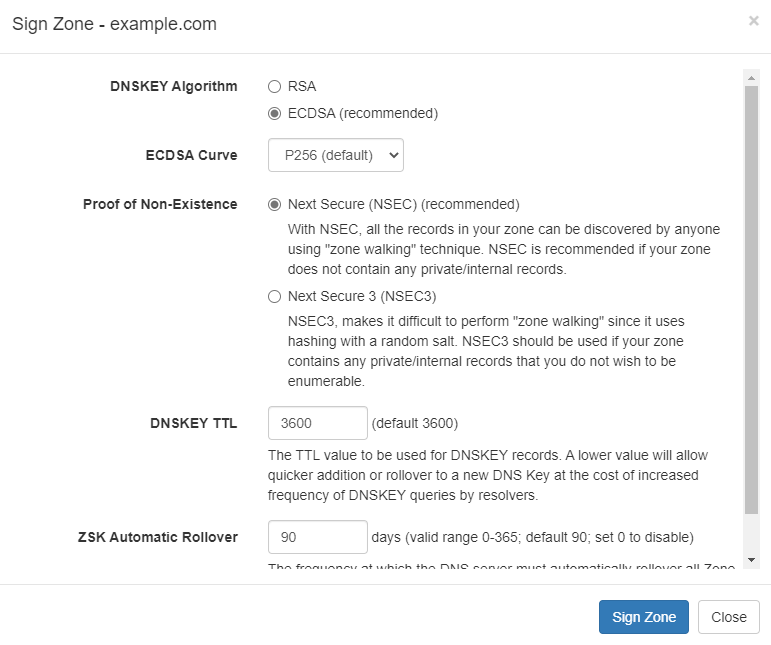
    The Sign Zone Dialog Box
  4. Select the recommended NSEC as the Proof Of Non-Existence option. If your zone contains private/internal sub domain name records then you may use the NSEC3 option to hide them.
  5. Select a suitable DNSKEY TTL value which by default is set to 3600 sec (1 hour). A lower value allows quick addition or rollover of DNS keys but will cause frequent requests for the DNSKEY records.
  6. Select a suitable ZSK Automatic Rollover value which is the frequent at which the DNS server will rollover the ZSK to a new key automatically.
  7. After you have confirmed all the above values, click on the Sign Zone button to start the zone signing process.

When the zone signing process completes, you will see DNSSEC related records populated in the zone. Click on the DNSSEC button on the top right corner of the zone view and you will see a new drop down menu pop up. Click on the Properties menu item to see the DNSSEC Properties dialog box which shows you all the options that you entered while signing the zone to allow changing them later.

The DNSSEC Properties Dialog Box
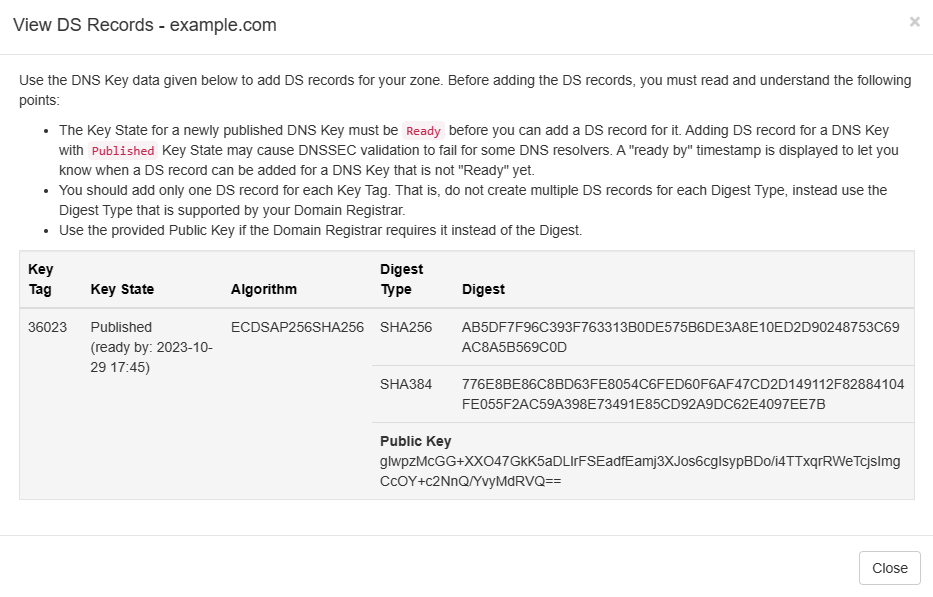
Adding DS Record

Your zone is now signed but since you haven't added a DS record in the parent zone, the zone still cannot be validated by DNS clients and is still insecure. The next step is to add a DS record in the parent zone so that your zone can be validated and become secure. To do that, click on the DNSSEC button on the top right corner of the zone view and click on the View DS Info menu item to see the View DS Info dialog box. The View DS Info popup shows all the details required to add the DS record. But, before you add the DS record ensure that the Key State value shows Ready. If the DNSKEY was just published, you will see the Key State as Published with a "ready by" timestamp in brackets. The timestamp tells you when the Key State will switch from Published to Ready state. Once the Key State becomes Ready, you can proceed to add the DS record for your zone.

The Primary Zone View DS Info Dialog Box

WARNING! The most important thing to remember about signing the zone is that you MUST wait until the Key State of the DNSKEY with Secure Entry Point (SEP) flag becomes Ready before adding the DS record in the parent zone. If you do not wait, you risk your zone to fail validation for recursive resolvers that have old records still in their cache. The wait time to Ready state ensures that all the caches have expired.

Once the DNSKEY record's Key State becomes Ready, login to your domain registrar's web panel, find your domain name and click on the Manage option to view the domain details. Find the DNSSEC Management option in there which may be inside the Manage Nameservers option. Here you will find options to create DS records that will be automatically updated by your registrar into the parent zone.

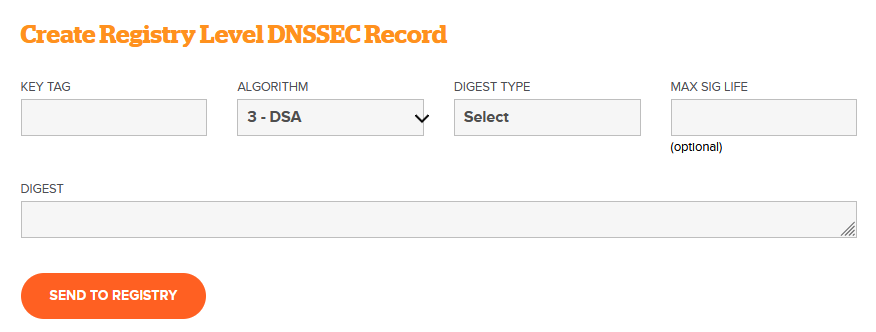
The Create DS Record Form (For name.com Registrar)

The View DS Info popup displays all required values i.e. Key Tag, Algorithm, Digest Type, and Digests. For adding the DS record, use the provided Key Tag value, select the Algorithm number 13 i.e. ECDSAP256SHA256 that was used to sign your zone, the Digest Type as SHA-256, and Digest value provided against the digest type SHA256. Ensure that you have correctly entered all the values and proceed to create the DS record.

WARNING! If you make a mistake in adding the DS record then it will cause validation errors to resolve your domain name resulting in down time for your clients who use a DNS resolver with DNSSEC validation enabled. Thus its recommended that you cross check all the values a couple of times before proceeding to add the DS record.

NOTE! You need to add only one DS record per DNSKEY that has a Secure Entry Point (SEP) flag. You do not need to add DS record for each Digest Type hash values that you see in the zone for the DNSKEY record.

The DNS server keeps a watch on the DS record automatically every 15 minutes by querying the parent zone for it. Once it find the published DS record, the Key State of the DNSKEY will get changed from Ready to Active indicating that the zone can now be validated using the KSK DNSKEY record.

Testing Your Domain

You can now check for the DS record that was added using the DNS Client tool by querying for your domain name with type set to DS. For example, if your domain name is example.com use the same to query with the type as DS. If you get a response with DS record in the answer section then you can confirm once again the values it shows. Note that it may take a while for the DS record to be published by your Top Level Domain (TLD) so you should wait and try again after a while if you get an empty response for the DS query.

Once you see the DS record for your domain name in the DNS Client tool, you can proceed to test DNSSEC validation for your domain name. Check the Enable DNSSEC Validation option in the DNS Client tool, enter your domain name, select the record type as A, and click on the Resolve button. If everything is right then you will see response with answer section containing the A records with DnssecStatus property set to Secure.

Note! Do not use the DNS Client tab that is built into the DNS web console for the above test, instead use the DNS Client website to test since the built-in tool automatically trusts your local zones and thus will always validate the DNS records in the response as Secure hiding any issues that you may have with the DS record.

You can also try the DNSViz tool that will show you the signed zone's details visually as a diagram and will also show you any errors that you may have in your overall configuration.

Backup

Once you have your zone signed and tested it to be validating correctly, you MUST take a backup of your zone files since the private key that was used to sign your zone is stored in the zone file. In case your server hosting the zone crashes causing loss of data, you will face operational issues that can cause downtime for your domain name.

Take a backup using the Backup Settings option that you will find at the bottom right side in the Settings section of the DNS web console. You must select at least the DNS Zone Files check box to create the backup zip file that contains all of the zone files.

Since the private keys are stored in the zone files, the backup zip file must be stored securely to prevent the private keys from leaking to unauthorized people. The backup zip file will help you restore your zones in a cases of hardware failure.

It is recommended to take a periodic backup of your DNS server to make it easy to restore your server quickly in case of any failures.

Key Rollover

Similar to how SSL/TLS certificates have an expiry date upon which you need to renew them, you need to perform a key rollover operation for your KSK and ZSK in your signed zones too. You have to define a policy that tells the number of days to keep the keys and make an operating procedure to rollover the keys.

The key rollover operation generates a new key pair and retires the existing key pair. The process is automatic for ZSK as per the configuration you have in the DNSSEC properties for the zone. The number of days that you have set for rollover for the ZSK will be used by the DNS server to automatically trigger the rollover process. 

For KSK, you have to manually trigger the rollover since you have to manually add the DS records in the parent zone for the new DNSKEY record. It is recommended that you do the KSK rollover once every year as a policy.

For ZSK type keys, you can start the key rollover process manually too if you wish from the DNSSEC Properties dialog by clicking on the Rollover button for the key that you wish to rollover. Once you click the Rollover button, the DNS server will automatically generate and add a new key pair with Key State as Published. Once the new Key's State becomes Active, the old key will be retired and removed automatically. Since ZSK type keys have automatic rollover feature available, you would never require to manually trigger the rollover operation.

For KSK rollover, follow the steps given below:

  1. Open the DNSSEC Properties dialog and click on the Rollover button for the KSK key to start the process manually. This will cause the DNS server to generate and add a new key pair with Key State as Published.
  2. Note the Key Tag number for the new KSK and close the DNSSEC Properties dialog. Click on the refresh icon that you see next to your zone's name to refresh the displayed records. Find the new DNSKEY record corresponding to the new KSK using the noted Key Tag number displayed as Computed Key Tag for the DNSKEY record.
  3. Check the Key State for the DNSKEY record which will be Published with a "ready by" timestamp in the brackets, just like you had it when you first signed the zone. Similar to how you had to wait for the Key State to become Ready the first time, you have to wait again for the same. The timestamp will tell you when to come back to expect the Key State to become Ready.
  4. When the Key State for the DNSKEY record becomes Ready, you can login to your domain registrar's web panel and create a new DS record for the new DNSSEC record similar to how you added the first DS record.
  5. Once you have added the new DS record, find the old DS record and remove it. Make sure to confirm that you are removing the old DS record by matching its Key Tag value with the ones that you see in the zone's DNSSEC Properties dialog.

Once you have added the new DS record and removed the old DS record, the DNS server will automatically check for the updated DS record every 15 minutes by querying the parent zone. Once it finds the new DS record published, it will set the Key State for the new DNSKEY record from Ready to Active and the old DNSKEY record will be automatically retired and eventually removed.

You can again test once the new changes using DNS Client or DNSViz tools like you did earlier.

Conclusion

It is highly recommended for every domain owner to sign their domain names with DNSSEC to make them secure. Self hosting your domain name using Technitium DNS Server is easy and secure with DNSSEC. Technitium DNS Server's DNSSEC implementation makes it easy and error free to configure and manage your signed zones. With an easy to use key rollover process, there is no scope to have any misconfiguration issues that can cause downtime.

If you have any comments or queries, do let me know in the comments section below or send an email to support@technitium.com.

Saturday, June 25, 2022

How To Self Host Your Own Domain Name

A lot of people self host their own blogs or websites but its rare for someone to host their own domain name. For most people, the domain name hosting provided by the domain name registrar is sufficient for their use case. People who need more control and features usually use popular services like AWS, Cloudflare, etc. In this blog post, we will see how to host and configure your own name servers for self hosting all your domain names.

Technitium DNS Server Is Both Authoritative And Recursive DNS Server

Should You Really Self Host?

The first question that may come to your mind is that if you should really be self hosting your own domain names? Self hosting is not a solution for everyone and you need to evaluate your reasons before coming to a decision on it.

You should self host your own domain name if:

  • You are looking to learn how to self host domain names so doing it will make sure that you learn all the aspects that come with it. This will help you learn how DNS works in general in a practical way.
  • You are a hobbyist and interested in self hosting but don't have anything critical being hosted.
  • You are an advanced user and want full control over your setup. You know exactly what you are looking for and are capable to handle any operational issues that may occur.

Pros And Cons Of Self Hosting

Self hosting your domain name gives you complete control over its setup and can use advanced features that may not be available elsewhere. But, like always this comes with its own pros and cons.

Some of the cons to self host your domain names that you may need to consider are:

  • You are solely responsible for your name servers. Which means you need to regularly monitor the setup to make sure things are working well. Any failure can cause your website to stop resolving and your email from from being delivered and received.
  • You need to have redundancy such that when your primary name server hosting your domain name fails, you have secondary name servers that can keep your domain name working.
  • Someone can easily take down your name servers with a DDoS attack. This equally applies to other self hosted services like web servers running your blog or website. But there are mitigations available that we will discuss.
  • Your name servers can be used for DNS amplification attacks. But for this too, there are mitigations like query rate limiting available to make such attacks useless.

But these pros to self host your domain names may want you to go ahead with it:

  • You get absolute control over your domain name and can configure it to work anyway you wish.
  • You get access to advanced features not available otherwise. You can also develop custom plugins that answer for your domain names as per your own business logic.
  • Unlike hosting web servers, if one of your names servers is down, your domain name will still resolve. With web servers its a bit complex to manage this but with DNS, you don't have to worry about it that much. This is since, you need at least one of your name servers to be online so that your domain name resolves.
  • You can sign your domain name for DNSSEC which may not be available with your current DNS provider. But not all Top Level Domain (TLD) names support DNSSEC so you may want to check that first. While this blog post does not cover DNSSEC signing, this subsequent blog post explains how to sign your domain name with DNSSEC.
  • You get access to DNS logs and live stats which may not be available with your current DNS provider.

Minimum Requirements

Now that you have made a decision to proceed, lets see the minimum requirements for the complete setup. To host you own name server, you need a server with a static IP address. You can host the server in-house but its recommended to use a cloud hosting provider like Digital Ocean (referral link). This is since, hosting a server in-house requires you to have an Uninterrupted Power Supply (UPS) setup to make sure the server keeps running during power outage and also have a stable Internet connection, which may be one of the most challenging thing to have in your region. Using a cloud hosting provider, all these challenges are outsourced so that you do not have to worry about downtime and backups.

A server with basic config like single core CPU and 1GB RAM can be sufficient for most cases. Such a server will will cost as low as $5/mo with Digital Ocean (referral link).

For redundancy, you should have at least one secondary name server so that if your primary name server does down for any reason, your domain keeps resolving via your secondary name servers. Ideally, the secondary name server must be in a different region so that any issue affecting the primary name server does not affect the secondary name server too. There are some free and paid secondary DNS hosting options available too that you can choose from which we will see later.

Another important requirement is that your domain's Top Level Domain (TLD) must support configuring "child name servers". A child name server is a feature that allows you to register a subdomain name of your own domain to be used as your own name server. For example, if your domain name is "example.com", a child name server domain will be something like "ns1.example.com" or "ns2.example.com". This allows you to use something like "ns1.example.com" as the domain name for your primary name server that is hosting your "example.com" zone.

If you have a .com or .net domain name then these TLDs support this feature but other TLDs may not support it. In such case, you need to buy a domain name whose TLD supports child name servers and use that domain for all you other domain names as the name server. To know if your TLD supports child name servers, just login to your domain registrar's DNS panel and find if there is a "child name server" or "register name server" option to configure in your domain's advanced settings.

The Plan

In this blog post, we will setup one primary name server and optionally another one to act as the secondary name server for redundancy. You can add any number of secondary name servers as you wish depending on your requirements or plan to get a secondary DNS hosting provider.

To move further with installation and the configuration, its important and helpful that you understand how DNS servers do recursive resolution. There are different types of DNS servers that perform different functions but, a single DNS server software can support to perform all of these functions.

The common types of DNS servers are:

  1. Authoritative Name Servers

    These are the DNS servers that host a domain name. The domain name is hosted as a zone which means that any request for the domain name and its subdomain names can be answered by this server. Which is why its called as the authoritative name server for that domain. To self host your domain name, we are going to setup authoritative name servers.

    An authoritative name server will respond with an answer to request only for the domain names it has a zone hosted for. A zone is a collection of DNS records that the authoritative name server must answer to. Any request with domain name not hosted will be responded with a REFUSED response code to indicate that the authoritative name server does not know an answer for the question.

    There can be one or more authoritative name server for a domain name. One of them is the primary name server while the rest of the other are secondary name servers. You can update DNS records only on the primary name servers and any changes you make are automatically synced to the secondary name servers.

  2. Recursive Name Servers

    These are the DNS servers that are commonly hosted by ISPs or public DNS providers like Google DNS, Cloudflare DNS, or Quad9. Internet client devices send a request to these servers when they want to resolve a specific domain name. Its the task of these servers to perform recursive resolution which is a process to discover the list of authoritative name servers for the domain name and then query them to find the answers requested by the client.

    A recursive name server has a preconfigured list of 13 root servers. These root servers are spread across the world and contain list of all Top Level Domains (TLDs) with their authoritative name server domain names and their IP addresses (known as glue addresses). The recursive resolution process first queries one of the root servers for the domain name to be resolved for which it receives a list of authoritative name servers for the domain's TLD. The recursive resolver then proceeds by sending a 2nd request to these new list of authoritative name servers for which it now receives another list of authoritative name servers for the domain name in the request. The recursive resolver again proceeds by sending a 3rd request to these authoritative name servers for the domain name to receive the final answer to the original question. This answer is cached to avoid repeating the recursive resolution process over and over again.

  3. Stub Resolvers

    These are the DNS servers that are commonly running on your WiFi routers and also on your device's operating system. These DNS servers forward any request they receive to Recursive Name Servers and cache the responses in memory to avoid frequent queries over network and to improve performance.

    So, when you enter a website's address in your web browser, the domain resolution request is first received by the stub resolver running on your device which then forwards the request to the DNS server IP addresses that are configured on your network adapter which usually will be the IP address of your Internet WiFi router. This router's stub resolver then forwards the request to the DNS server IP address configured in its WAN settings by your ISP which are the Recursive name servers.

Now that you have a fair understanding of the plan and some basic concepts that we can proceed with the installation.

Installation

We will install Technitium DNS Server on your server and call it as the primary name server. You can optionally choose to create one or more secondary name servers by following the exact same installation steps.

We will be using Ubuntu server here but you can choose any distro of your choice and follow similar instructions. You can choose to use a different OS for your server but its recommended to use a Linux based OS to keep the hosting costs to a minimum.

Connect to your server using SSH and run the single line installation command given below to install the DNS server. You can also install it as a docker image or manually install the DNS server by following the detailed install instructions.

$ curl -sSL https://download.technitium.com/dns/install.sh | sudo bash

Once the installation is complete, you can access the DNS server's web console at http://<server-ip-address>:5380/ and quickly setup a strong admin password.

Configuration

Before proceeding with the configuration, you must decide the domain names to be used for your primary and secondary name servers (if any). For example, if your domain name is "example.com" then you should select something like "ns1.example.com" as the domain name for your primary name server, "ns2.example.com" as the domain name for your secondary name server, and so fourth if you wish to have more than one secondary name servers.

If your domain's TLD does not support registering child name servers, then you need to first host a domain name which supports it. If you don't own such a domain name then you need to buy one before proceeding.

Make a list of the selected domain names for your name servers with their corresponding IP addresses as shown in the example below to help with the configuration:

ns1.example.com		<primary name server's ip address>
ns2.example.com		<secondary name server's ip address>

If your server hosting provider supports IPv6 then enable IPv6 for your server and enter the IPv6 address too in the above said list.

Configuring Primary Name Server:

We will now proceed to configure the primary name server. Login to the primary name server's DNS web console and follow the steps below:

  1. Go to the Settings > General section, set the selected primary name server's domain name as the "DNS Server Domain", and click on Save Settings button at the bottom.
  2. Go to the Zones section, and click on the Add Zone button. Enter your domain name that you want to self host in the Add Zone window, keep the Type as Primary Zone and click on Add button to create a primary zone for your domain name.
  3. Once you have created the primary zone, you will see only one NS record and an SOA record. Edit the SOA record and enter a valid email address as the "Responsible Person" on which you can receive emails and save the record.
  4. Add NS records for all of the secondary name servers that you have planned. You do not need to enter any glue address for adding the NS records.
  5. Add A records for all the name servers based on the list of name servers you prepared before starting the configuration. Each NS record's domain name must have a corresponding A record in the zone. If your name servers have IPv6 address, add AAAA records too for them corresponding to each NS record.
  6. Add all the other records for the primary zone manually by referring at your existing DNS provider's panel. Once you have added all the records, the primary zone is ready for the next step.

Switching Domain's Name Servers:

Now that the primary zone is ready with all the records, we can proceed to make it live so that other recursive name servers on the Internet can find it to resolve the domain name. To do that, login to your domain registrar's DNS panel and follow the steps below:

  1. Find your domain name in the registrar's DNS panel and click on it to see the details section.
  2. Find option in the domain details section that says something like "Nameserver Registration" or "Child Nameservers". Once you find the correct option, enter the child name server domain names from the list of name servers (e.g. ns1.example.com) and their corresponding static IP addresses. Once you save the changes, the registrar will update your TLD's name servers with the details of the child name servers and their IP addresses (glue addresses).
  3. Find option in the domain details section that says something like "Manage Nameservers". Once you find the correct option, enter the domain names of all your name servers that were registered in the previous step. Remove any previously existing name server entries that you see in there and keep just the ones you have entered. Once you save these changes, you will start seeing traffic coming on your primary name server as soon as the the name server (NS) records changes are updated to your TLD name servers. This can be as quick as a few seconds or may take a while for some TLDs depending on how they have implemented the update process.

Testing Primary Name Server:

You can test your setup to confirm if your primary name server is indeed answering requests for your domain using the DNS Client website. Just go to dnsclient.net, keep the Server option to Recursive Query, enter your domain name, and click on Resolve button. In the response that you get, you should see the "Metadata.NameServer" set with the domain name of your primary name server. If its still showing you one of the the domain names of your old name servers then it means that the changes have still not updated and you should wait for some more time to test it again.

Configuring Secondary Name Servers:

Once you have made sure that the primary name server is resolving the domain name, you can then configure one or more optional secondary name servers. Its recommended to have at least one secondary name server but if you do not wish to have one, you can skip this part. Login to the secondary name server's DNS web console and follow the steps below:

  1. Go to the Settings > General section, set the secondary domain name as the "DNS Server Domain", and click on Save Settings button at the bottom.
  2. Go to the Zones section, and click on the Add Zone button. Enter your domain name in the Add Zone window, select the type as Secondary Zone, and click on Add button to create the secondary zone. To add secondary zone, primary name server addresses were not needed since the domain name is publicly resolvable and so the DNS server will find out the primary name server automatically.
  3. Once the zone is created, the DNS server will try to perform zone transfer to sync all the DNS records from the primary zone into the secondary zone. The zone status will show as Expired till the records are synced. You can click on the refresh icon next to the domain name in the zone to check if the records have been synced. If the records didn't sync and the zone status is still Expired after a minute, you should check the DNS server's logs from the web console to see if there are any errors.

When you see the records populate in the secondary zone, the configuration for it is completed. Repeat the same steps for any other secondary name servers that you may have planned. Since, we had added registered all the name server domain names in the domain registrar's panel, the secondary name server will too start seeing traffic for your domain name soon.

Self Hosting Another Domain Name

Now that you have one of your domain names self hosted, you can add one or more of your other domain names to self host. Follow the steps below for self hosting your other domain names:

  1. Login to your primary name server's DNS web console.
  2. Go to Zones section and add a new primary zone for your second domain name.
  3. Once the primary zone is created, you will see one NS and an SOA record. Edit the SOA record with a valid email address that you can receive emails on.
  4. Add NS records for your secondary name servers that you wish to be used for this second domain name. You do not need to provide any glue addresses for these NS records.
  5. Add all other records in the primary zone to complete the primary zone configuration.
  6. Login to your secondary name server's DNS web console.
  7. Go to the Zones section and add a new secondary zone for your second domain name.
  8. The secondary name server will perform automatic zone transfer to sync all the records from your primary name server.
  9. Login to your domain registrar's web panel.
  10. Find the second domain name and click on it to see the details section.
  11. Find option in the domain details section that says something like "Manage Nameservers". In this option, remove the existing name servers and add the domain names of your primary and secondary name servers. Once you save these changes, you will soon start seeing traffic coming on your primary and secondary name servers for your second domain name.

Additional Configuration

Apart from the configuration to host the zones, there are a few things that must be configured too:

  • Enable HTTPS for DNS Web Console
    You should enable HTTPS for the DNS web console for security reasons. The bare minimum option is to enable HTTPS with self signed TLS certificate option in Settings > Web Service section. A better option is to configure certbot to renew Let's Encrypt certificate and configure it in the Settings > Web Service section.
  • Query Rate Limiting
    To mitigate from attacks that use your DNS server for DNS amplification attacks, you should configure the Queried Per Minute (QPM) options in Settings > General section to rate limit queries per client subnet.
  • Drop Requests App
    Install the Drop Requests DNS App from the Apps section's App Store option. This app will allow you to drop requests that match from the given list of names and/or types. Take a look at the app's json config to see how certain names or types can be blocked.
  • Backup
    Once all the config is complete you should take backup for the entire DNS server from Backup Settings option in the bottom right of the Settings section. It is recommended to take regular backups this way so that you can quickly restore from the latest backup when your DNS server requires rebuilding due to any issues. Enabling backup option with your cloud hosting provider is also highly recommended.

Configuring 3rd Party Secondary DNS Provider

There are 3rd party DNS hosting providers that allow you to host secondary zones with them. Most of them are paid services but if you are hosting your personal project domain names then you can use the free secondary DNS service provided by NS-Global. Follow the sign-up instructions on their website to add a secondary name server for your domain names. Note, that you will need to use the Zone Options to configure zone transfer and notify for setting up the secondary zone with NS Global.

Once you have the secondary zone created with NS Global, you can update the name servers for your domain from the domain registrar's panel to allow discovering the new secondary name server.

Conclusion

With some efforts to learn DNS concepts, its possible for anyone determined to self host their own domain names. Technitium DNS Server allows easy installation, configuration, and maintenance of DNS zones with minimal efforts. With 3rd party secondary DNS service, you can add more redundancy and reliability to your setup.

If you have any comments or queries, do let me know in the comments section below or send an email to support@technitium.com.

Saturday, March 26, 2022

Technitium DNS Server v8 Released!

I am happy to announce the release of Technitium DNS Server v8, a cross-platform, free, open source software that can be used by anyone, be it a novice or an expert user. It features an easy to use web based GUI and works with default config that allows the server to run out-of-the-box.

This is a major release that adds many core DNS features like support for DNSSEC validation and signed zones.

Download the latest update for Windows, Linux, macOS, or Raspberry Pi!

Technitium DNS Server
Technitium DNS Server v8

Some of the notable features that were added to this latest update are:

  • DNSSEC validation support for both recursive resolution, forwarders, and conditional forwarders.
  • DNSSEC validation support for all DNS transport protocols (Do53, DoT, DoH, & DoH JSON).
  • Support to allow hosting primary and secondary DNSSEC signed zones.
  • Support for all RSA and ECDSA DNSSEC algorithms.
  • EDNS(0) [RFC 6891] support.
  • Extended DNS Errors [RFC 8914] support.
  • Codebase upgrade to .NET 6 runtime.

Read the change log to know more details about this latest update. 

Any comment or feedback is really appreciated and helps a lot in adding new features and fixing bugs. Send your feedback or support requests to support@technitium.com. You can also post on /r/technitium on Reddit for community support. For any feature request or reporting bugs, create an issue on GitHub.

The DNS Server source code is available under GNU General Public Licence (GPL) v3 on GitHub.

You can make a contribution to the project by becoming a Patron and help in developing new software, updates and adding more features possible. Become a Patron now!