Combined with DNS-over-TLS and DNS-over-HTTPS, Technitium DNS Server provides a good level security and privacy from network level DNS attacks and from adware. This makes it a must have tool if you are a privacy and security conscious person.
Technitium DNS Server is cross platform and works on Windows, Linux or macOS.
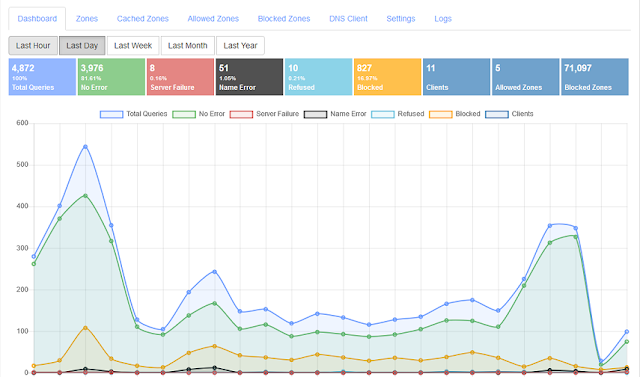 |
| Technitium DNS Server v2.0 |
How Does It Work?
The Ad blocking feature works using the DNS Sinkhole method. With this feature enabled, for all the blocked domain names, the DNS Server will respond with 0.0.0.0 IPv4 address and :: for IPv6 address making the Ads fail to load making the website you visit free from Ads. This can not only block Ads but also adware, malware, social networks, porn etc. based on the block lists you configure in settings.
On your computer, you need to install the DNS Server and configure your network adapter's DNS settings to use the locally hosted DNS server. Once this is done, you need to configure the Block List URL settings to start blocking Ads. Once the DNS Server loads the block lists, it would respond with 0.0.0.0 IP address for the blocked websites making them fail to load.
You may also install the DNS Server on any spare computer on your network and configure your home or office router with IP address of this spare computer as DNS server in DHCP settings. With this setup, all your computers and devices like mobile phones would use the installed DNS Server blocking Ads and malware domains on all devices without installing any additional software on them.
Configuring Block Lists
To enable Ad blocking, you need to configure Block List URLs in the settings. Known and popular block lists are already listed in the Quick Add drop down list from where you can just click and add those URLs.
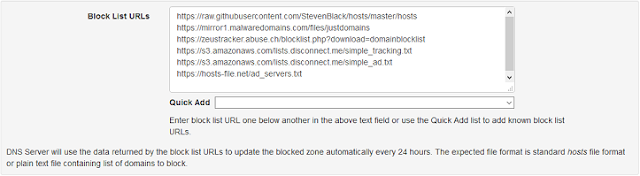 |
| Technitium DNS Server Block List Configuration |
If you are not sure, just select the Default option from the Quick Add drop down list and a default set of block list URLs would get configured.
Once done, click the Save Settings button at the bottom of the page to save the changes and start the block list download background process. These configured block lists are automatically downloaded every 24 hours to keep the DNS Server blocked zone updated.
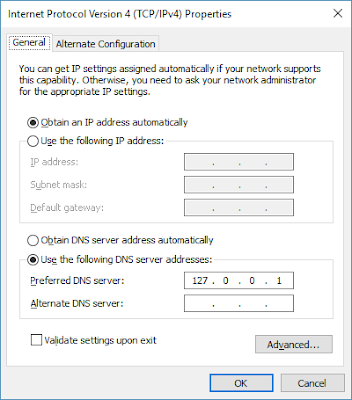
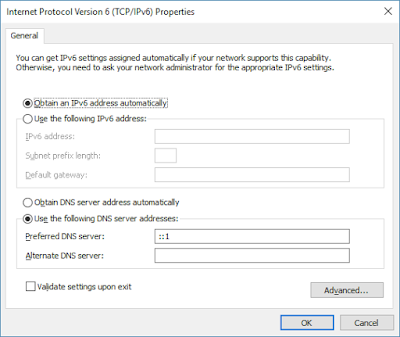
If you have the DNS server installed directly on your computer then don't forget to configure your network adapter's DNS server settings to 127.0.0.1 (for IPv4) and ::1 (for IPv6). Without these network configuration changes, the DNS Server wont get any queries to respond to and things wont work as intended.
If you setup the DNS server to be used on the network by all devices then do configure your router's DHCP config and set the IP address of the computer running the DNS server as the DNS for your network. By configuring the router's DHCP, you don't need to manually configure any of your devices on the network.
 |
| IPv4 DNS Server Network Configuration |
 |
| IPv6 DNS Server Network Configuration |
That's It!
Once the configuration is done, just check the Dashboard on the web console after a couple of minutes to see the number of blocked domains in the Blocked Zones widget. If there are too many block list URLs configured, it may take few more minutes for all of them to get downloaded and loaded.
If you have any further queries, do write them below as comments or send an email to support@technitium.com.