Update (Oct 20, 2024): DNS server v13.1 now includes "Secondary ROOT Zone (RFC 8806)" option in Add Zone dialog reducing this entire blog post into a single click operation.
Update (Sept 28, 2024): With the release of v13 of DNS server, there is no need to follow this blog post's requirement to create a separate DNS server instance to run the secondary ROOT zone. The v13 update now supports ZONEMD validation and the ROOT zone also includes ZONEMD record making it possible to validate the ROOT zone directly. You can now create the secondary ROOT zone on your existing DNS server instance and enable the ZONEMD validation to automatically validate the ROOT zone contents after each zone transfer.
Update (June 11, 2022): The previous blog post instructed how to run a secondary root zone locally without DNSSEC considerations since the Technitium DNS Server version before v8.0 did not support DNSSEC. Now that DNSSEC is supported, it is highly recommended to update your local root zone deployments as per the the new instructions in this blog post. The new configuration changes comply with all the requirements in RFC 8806.
Introduction
A DNS recursive resolver is typically primed with a list of Root Servers which it uses to resolve queries. When the recursive resolver receives a query, it queries to one of the root servers to get back a list of top level domain (TLD) name servers. It then queries those TLD name servers to get back another list of name servers hosting the domain name. This process is done recursively until the an answer for the query is resolved.
The DNS recursive resolver maintains a cache to avoid frequent queries and thus improving its performance. However, when the cache expires or is flushed, the recursive resolution process is performed again.
During the recursive resolution process, there is a possibility that the response from root server is delayed due to network issues or other events like the root server being under a Denial of Service (DoS) attack. There could also be passive monitoring of DNS requests going to root servers by an on path actor compromising privacy.
To prevent these issues and to improve resiliency there is a good option to run a Root Server locally on your DNS resolver.
There are several advantages of running a Root Server locally:
- The Root zone contains all the TLD name servers and their IP addresses. This allows the DNS resolver to skip the initial query to the Root Server and directly query to the TLD name servers saving time.
- Since the Root zone is running locally, queries for non existent top level domain (TLD) names are resolved locally.
- This also improves resiliency since the Root zone is local and thus there is no immediate dependency on the Root Servers for recursive resolution.
There are a few disadvantages too:
- If there are any updates to the Root zone, it will take slightly longer for those changes to sync to your local Root zone. Though there wont be much of a noticeable issue.
- If your local Root zone is not updating due to any reason and it was not detected, then the local Root zone will expire after 7 days (as per Root SOA Expiry). This may cause some DNS resolvers to fail to resolve any queries when cache expires. Technitium DNS Server however will fall back to root hints in such a case.
Considering both the advantages and disadvantages, its good to have a Root zone locally for a recursive resolver.
Sourcing The Root Zone
The root zone is available from ICANN DNS servers via zone transfer (AXFR-over-TCP):
- xfr.cjr.dns.icann.org (192.0.47.132, 2620:0:2830:202::132)
- xfr.lax.dns.icann.org (192.0.32.132, 2620:0:2d0:202::132)
The following Root Servers also support zone transfer (AXFR-over-TCP):
- b.root-servers.net (199.9.14.201, 2001:500:200::b)
- c.root-servers.net (192.33.4.12, 2001:500:2::c)
- d.root-servers.net (199.7.91.13, 2001:500:2d::d)
- f.root-servers.net (192.5.5.241, 2001:500:2f::f)
- g.root-servers.net (192.112.36.4, 2001:500:12::d0d)
- k.root-servers.net (193.0.14.129, 2001:7fd::1)
It is recommended to have DNSSEC enabled on your DNS resolver. Use recursive ACL to make sure that your DNS resolver accepts queries only from known clients to protect from DNS amplification attacks.
Configuration
It is assumed here that you already have Technitium DNS Server installed and running on your server. To run the root zone locally, we need to run another instance of Technitium DNS Server on the same server. This second, local instance of the DNS server will answer requests only on loopback interface and thus wont be accessible from the network. The second DNS server instance will host the root secondary zone. Your currently running DNS server instance will query this second DNS server instance when root zone records are required.
While this blog post focuses on running the root server instance locally on the same server that is currently running your DNS server instance, it is possible to run it on a different server such that two or more DNS servers can be configured to use that single root server instance. The only thing that must be taken care of is to make sure that the root server instance is not used as a DNS server for normal domain lookups.
Note: Before proceeding, make sure to take a backup of the DNS server instance that you already have running in case you want to start over. You can create a backup zip file by clicking Backup Settings at the bottom right of the Settings section.
Creating A Second Local DNS Server Instance
Since, we need two DNS server instances running, the admin web console which runs by default on TCP 5380 port will cause a conflict. To prevent this, the second instance needs to be configure to run on a different port so we choose TCP 5381 for it. Follow the steps below to get the second instance running.
On Linux Installation:
-
Create a systemd service for running the second DNS server instance by
following the steps below:
Copy the systemd.service template as a new dns2.service systemd service:$ sudo cp /opt/technitium/dns/systemd.service /etc/systemd/system/dns2.service
Edit the dns2.service file in nano:$ sudo nano /etc/systemd/system/dns2.service
Explicitly specify a different config folder to use /etc/dns2 as shown below:[Unit] Description=Technitium DNS Server [Service] WorkingDirectory=/opt/technitium/dns ExecStart=/usr/bin/dotnet /opt/technitium/dns/DnsServerApp.dll /etc/dns2 Restart=always # Restart service after 10 seconds if the dotnet service crashes: RestartSec=10 KillSignal=SIGINT SyslogIdentifier=dns-server-2 [Install] WantedBy=multi-user.target
Exit nano saving the dns2.service file. - Login to the first DNS server instance by opening the url http://<server-ip-address>:5380/, go to Settings > Web Service section and change the Web Service HTTP Port to 5379 so that the default port is available temporarily for the second instance. Click on Save Settings button and the web console will automatically redirect you to the new DNS web console URL. Keep this tab open for later use.
-
Start the second DNS server instance:
$ sudo systemctl enable dns2.service
$ sudo systemctl start dns2.service
- Open the url http://<server-ip-address>:5380/ to access the web console of the second instance. Go to Settings > General section and set 127.0.0.2 as the DNS Server Local End Points replacing any existing values. Go to Settings > Web Service section and edit the Web Service HTTP Port to 5381 and click on Save Settings. The web console will automatically redirect you to the new URL.
- Switch to the first DNS server's web console tab that was kept open. Go to Settings > General section and set 127.0.0.1 and <server-ip-address> (use your actual server's IP address) as the DNS Server Local End Points replacing any existing values. Go to Settings > Web Service section and change the Web Service HTTP Port back to 5380 now that the second DNS server instance is running on port 5381. Click on Save Settings button and the web console will automatically redirect you to the new DNS web console URL.
On Windows Installation:
- Click on Start, type cmd, right click on the command prompt item and click Run as administrator to open CMD as an administrator.
-
Run the following command in CMD to create a Windows service for running the
second DNS server instance and explicitly provide the path to a different
config folder
C:\Program Files (x86)\Technitium\DNS Server\config2\ for use:
C:\Windows\system32> sc create DnsService2 binPath= "C:\Program Files (x86)\Technitium\DNS Server\DnsService.exe \"C:\Program Files (x86)\Technitium\DNS Server\config2\"" DisplayName= "Technitium DNS Server 2" start= auto
- Login to the first DNS server instance by opening the url http://<server-ip-address>:5380/, go to Settings > Web Service section and change the Web Service HTTP Port to 5379 so that the default port is available temporarily for the second instance. Click on Save Settings button and the web console will automatically redirect you to the new DNS web console URL. Keep this tab open for later use.
-
Start the second DNS server instance:
C:\Windows\system32> sc start DnsService2
- Open the url http://localhost:5380/ to access the web console of the second instance. Go to Settings > General section and set 127.0.0.2 as the DNS Server Local End Points replacing any existing values. Go to Settings > Web Service section and edit the Web Service HTTP Port to 5381 and click on Save Settings. The web console will automatically redirect you to the new URL.
- Switch to the first DNS server's web console tab that was kept open. Go to Settings > General section and set 127.0.0.1 and <server-ip-address> (use your actual server's IP address) as the DNS Server Local End Points replacing any existing values. Go to Settings > Web Service section and change the Web Service HTTP Port back to 5380 now that the second DNS server instance is running on port 5381. Click on Save Settings button and the web console will automatically redirect you to the new DNS web console URL.
Note: On Windows Server 2022, ensure that you do not enable the HTTP/3 protocol option from Settings > Web Service section. This is since the DNS server keeps thousands of UDP sockets open and it may happen that the port used for HTTP/3 may clash with an open UDP socket from the root zone instance causing the main DNS instance to fail to bind the web service on the same port when HTTP/3 is enabled.
On Docker:
-
Create a docker-compose.yml file in a folder with contents as show
below to create the first DNS server instance:
version: "3"
services:
  dns-server:
    container_name: dns-server
    hostname: dns-server
    image: technitium/dns-server:latest
    ports:
      - "5380:5380/tcp" #DNS web console
      - "127.0.0.1:53:53/udp" #DNS service
      - "127.0.0.1:53:53/tcp" #DNS service
      - "<server-ip-address>:53:53/udp" #DNS service
      - "<server-ip-address>:53:53/tcp" #DNS service
    environment:
      - DNS_SERVER_DOMAIN=dns-server #The primary domain name used by this DNS Server to identify itself.
    volumes:
      - config:/etc/dns
    restart: unless-stopped
volumes:
    config:
Note: You can edit your existing docker-compose.yml file that you used to run your existing container with above port changes and rebuild it. -
Click on Start, type cmd, right click on the command prompt item and
click Run as administrator to open CMD as an administrator. Navigate
to the folder where the docker-compose.yml exists using the
CD <folder-path> command. Run the following command to create
the docker container:
docker-compose up -d
-
Create a docker-compose.yml file in another folder with contents as
show below to create the second DNS server instance:
version: "3" services: dns-server: container_name: dns-server-2 hostname: dns-server-2 image: technitium/dns-server:latest ports: - "5381:5380/tcp" #DNS web console - "127.0.0.2:53:53/udp" #DNS service - "127.0.0.2:53:53/tcp" #DNS service environment: - DNS_SERVER_DOMAIN=dns-server-2 #The primary domain name used by this DNS Server to identify itself. volumes: - config2:/etc/dns restart: unless-stopped volumes: config2: -
Click on Start, type cmd, right click on the command prompt item and
click Run as administrator to open CMD as an administrator. Navigate
to the folder where the docker-compose.yml exists using the
CD <folder-path> command. Run the following command to create
the docker container:
docker-compose up -d
Configuring The Root Zone
To configure the root zone, open the second instance web console at http://<server-ip-address>:5381/ and go to the Zones section. Click on the Add Zone button to create a secondary zone for . as the zone name. Enter the primary name server addresses as shown in the screenshot below:
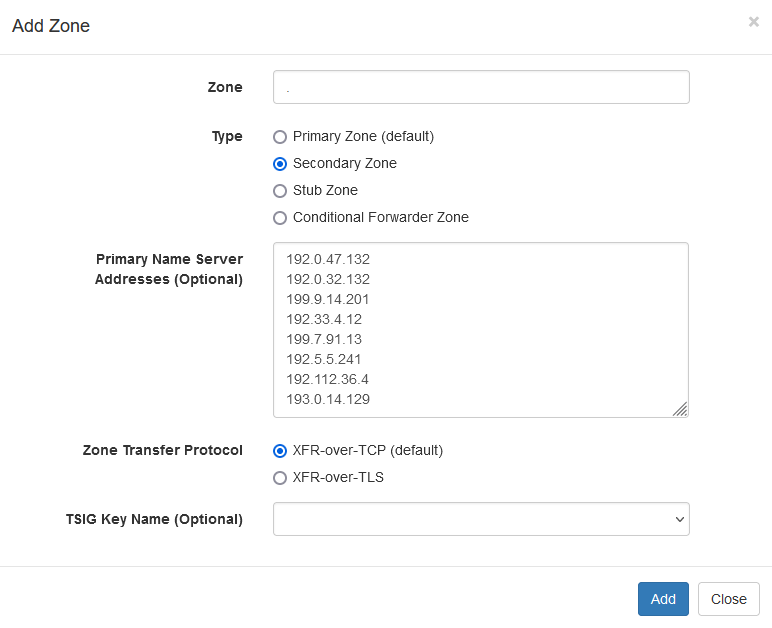
|
|
Configuring Local Secondary Root Zone |
Once you have the secondary zone created, wait for a few seconds for the DNS server to perform the zone transfer. The Root zone meanwhile will show as expired. If its taking a lot of time, do check the DNS server logs to see if there are any errors being logged.
After the secondary zone is synced, you will see all the root zone records. There are thousands of records and it may take a couple of seconds for the DNS panel to list all of them. Here is what you should see in the DNS zone:
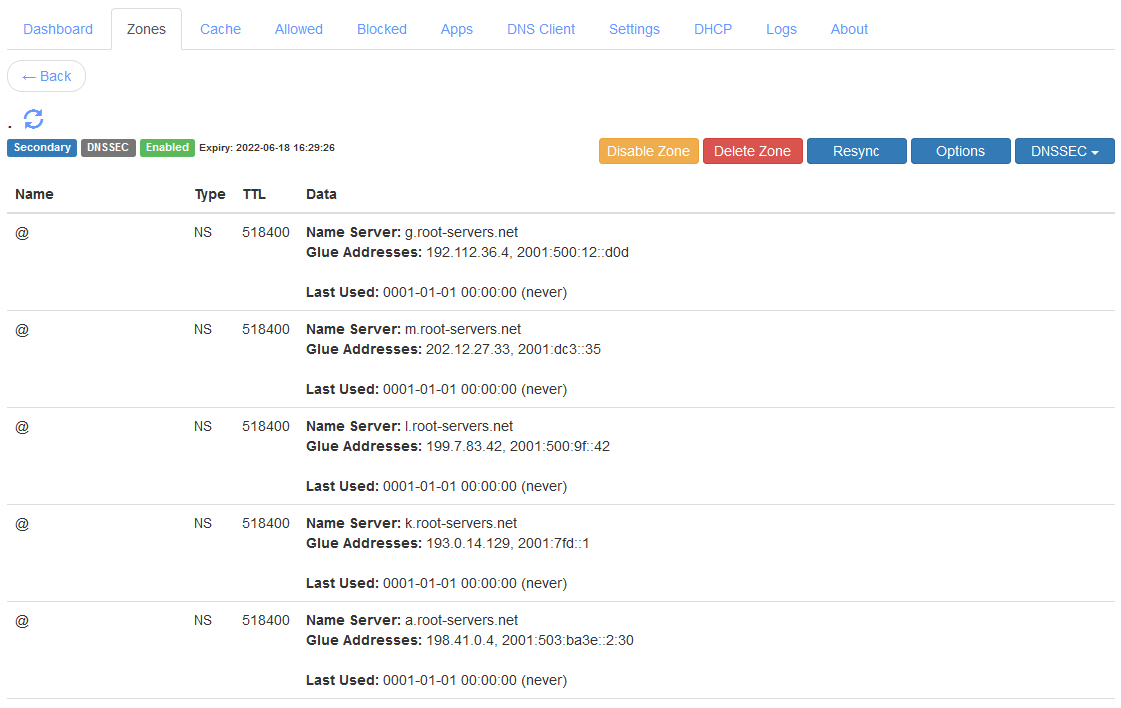
|
|
Local Secondary Root Zone |
Now, open the first instance web console at http://<server-ip-address>:5380/ and go to the Zones section. Click on the Add Zone button to create a Conditional Forwarder Zone for . as the zone name and with the Use "This Server" option enabled. Once the zone is created, click Add Record to add a record of NS type, with localhost as the Name Server, and 127.0.0.2 as the Glue Address. You can now delete the FWD record that you see. Once done, you should have the conditional forwarder zone config as shown below:

|
|
Local Static Stub Root Zone |
This NS record will now make the conditional forwarder zone act as a static stub zone such that it will now query the specified name server when performing recursive resolution.
In case you had decided to run the root server instance on another server, just use its domain name as the name server and it's IP address as the glue address for the NS record to complete the configuration.
References
If you have any queries do write in the comments section below or send an email to support@technitium.com.
hello there, dear dev.
ReplyDeletei have a problem with technitium server on dhcp scope.
windows client can't connect to my server because it can't get the ip address.
i have tried with different devices and get the same result, not getting ip.
but, the server is sending a DHCPOFFER to client and the client keep sending requests.
it is as if the windows client didn't see the offer.
it work okay with android phone and linux tho.
is there way to fix this? is it a client problem or the dhcp server problem?
thanks in advance and sorry for my messy english.
Thanks for asking. It could be some config issue. Since linux and android clients are working so it seems you have configured windows firewall to allow udp 67 port. Do send a screenshot of you DHCP scope settings and your network adapter details to support@technitium.com to get help.
DeleteI really wish there was a way to delete stale DHCP leases. I just reserved IP's on a scope and technetium does not respect the IP you set in the reservation menu until the old lease has expired.
ReplyDeleteI think that's ridiculous.
Anyway, is there any plan to implement this feature? Maybe in an "advanced user" menu? Because every other DHCP server allows you to remove leases. Thanks.
Thanks for the comment. I will try to add an option in next release.
DeleteIs configuring TDNSS like this potentially more of a privacy issue? I use TDNSS for all devices on my local network (via DHCP). TDNSS then does DNS forwarding over DNS-over-TLS to Google and Quad9 so that DNS traffic doesn't leak out to my ISP and beyond.
ReplyDeleteThanks for asking. Threat model for each person or organization depends on whom they want to protect against. So, option in this blog post may suit for some scenarios while using encrypted DNS will suit for others.
DeleteIf your scenario is to protect privacy from your ISP then using encrypted DNS is a option for this. However, in such case your privacy is not safe from public DNS providers too.
For protecting your privacy from both your ISP and public DNS providers, you can host your own encrypted DNS server using a cheap Linux hosting and then use that service as your encrypted DNS forwarder on your locally running DNS server.
Another option is to use Tor and forward your traffic to public DNS providers but then its much better to use Tor for complete web browsing using Tor Browser.
So make a choice as per your own privacy needs.
Hi there,
ReplyDeleteDoes this technique can be applied to unbound as well?
Also, do technitium folks have plans for an OpenWRT package of technitium dns? (I really hope so)
Thanks.
Thanks for asking. You can run a root server locally using any DNS server software that supports hosting secondary zones. Unbound is recursive resolver with only limited support to host zones so I am not sure if it can host secondary zones.
DeleteI don't have any device running OpenWRT to do any tests. Also I am not sure if it can run dotnet since the DNS server runs on it. It also depends on what ARM CPU version the device has since dotnet supports only v7 and above versions.
Hello there,
ReplyDeletei want some help in setting up Root Zones / Secondary Zone,
it always give me this error when the primary name servers inserted;
"Error! DNS Server failed to find SOA record for:"
Thank you in advance.
Some Info/Log:
Info: Technitium DNS installed on Arch Linux
Log:
[Time] DnsServerCore.Dns.DnsServerException: DNS Server failed to find SOA record for:
at DnsServerCore.Dns.Zones.SecondaryZone.CreateAsync(DnsServer dnsServer, String name, String primaryNameServerAddresses, DnsTransportProtocol zoneTransferProtocol, String tsigKeyName) in Z:\Technitium\Projects\DnsServer\DnsServerCore\Dns\Zones\SecondaryZone.cs:line 141
at DnsServerCore.Dns.ZoneManagers.AuthZoneManager.CreateSecondaryZoneAsync(String zoneName, String primaryNameServerAddresses, DnsTransportProtocol zoneTransferProtocol, String tsigKeyName) in Z:\Technitium\Projects\DnsServer\DnsServerCore\Dns\ZoneManagers\AuthZoneManager.cs:line 771
at DnsServerCore.WebServiceZonesApi.CreateZoneAsync(HttpListenerRequest request, JsonTextWriter jsonWriter) in Z:\Technitium\Projects\DnsServer\DnsServerCore\WebServiceZonesApi.cs:line 1017
at DnsServerCore.DnsWebService.ProcessRequestAsync(HttpListenerRequest request, HttpListenerResponse response) in Z:\Technitium\Projects\DnsServer\DnsServerCore\DnsWebService.cs:line 827
This error means that the DNS server is unable to fetch the SOA record for the root zone from your network. This could be some temporary network issue or that your ISP is blocking it. Try again and see if that works.
DeleteI've managed to setup my server following the instructions but i think I've found a bug. When adding the secondary root zone using the icann servers, technitium gave error of tsig null key doesn't exist (can't remember the exact wording). I've fixed it by first flushing the cache and instantly re-add the icann servers before technitium manage to rebuild its cache again.
ReplyDeleteAlso a few questions; on which technitium server should i enable cache, on the root server or on the recursive server? And if i wanted to add blocklists, on which server should the blocklist be?
Thanks for the bug report. It seems to be a bug in the js code that got introduced due to changes done in the latest update. The bug does not come when you view the Settings tab since visiting the tab will update internal variables which were not initialized earlier. So this bug is not related to any caching, its just that you visited Settings section and it worked. I will release an update this weekend to fix this bug.
DeleteFor your other question, the caching cannot be disabled so just keep all the default settings as is and it will be ok. You need to add block list on the recursive server which the clients will be querying. The root server instance is supposed to only answer root zone queries and should not be configured to do anything else.
The bug you reported is now fixed with v9.1 update. Do update and let me know.
DeleteHow To add AWS records?
ReplyDeleteAre you running the DNS server as recursive or are you self hosting your zones? Which AWS records do you wish to add?
DeleteAre we supposed to see activity on the root server's dashboard (the instance on port 5381)? The dashboard there is blank, with no connections or activity. The dashboard on the management instance (port 5380) has a bunch of Server Failure errors. The logs for dns-root don't show any errors. I suspect that the issue is with communicating between the two instances, but I don't know why.
ReplyDeleteLog for dns-manager:
[2023-03-12 22:11:31 UTC] DNS Server failed to resolve the request with QNAME: version.crowdsec.net.hitronhub.home; QTYPE: A; QCLASS: IN;
TechnitiumLibrary.Net.Dns.DnsClientNoResponseException: DnsClient recursive resolution failed: no response from name servers [dns-root (127.0.0.2)].
---> System.Net.Sockets.SocketException (110): Connection timed out
at TechnitiumLibrary.Net.SocketExtensions.UdpQueryAsync(Socket socket, ArraySegment`1 request, ArraySegment`1 response, IPEndPoint remoteEP, Int32 timeout, Int32 retries, Boolean expBackoffTimeout, Func`2 isResponseValid, CancellationToken cancellationToken) in Z:\Technitium\Projects\TechnitiumLibrary\TechnitiumLibrary.Net\SocketExtensions.cs:line 142
at TechnitiumLibrary.Net.Dns.ClientConnection.UdpClientConnection.QueryAsync(DnsDatagram request, Int32 timeout, Int32 retries, CancellationToken cancellationToken) in Z:\Technitium\Projects\TechnitiumLibrary\TechnitiumLibrary.Net\Dns\ClientConnection\UdpClientConnection.cs:line 127
at TechnitiumLibrary.Net.Dns.DnsClient.<>c__DisplayClass67_0.<g__DoResolveAsync|1>d.MoveNext() in Z:\Technitium\Projects\TechnitiumLibrary\TechnitiumLibrary.Net\Dns\DnsClient.cs:line 4034
--- End of stack trace from previous location ---
at TechnitiumLibrary.Net.Dns.DnsClient.<>c__DisplayClass67_0.<g__DoResolveAsync|1>d.MoveNext() in Z:\Technitium\Projects\TechnitiumLibrary\TechnitiumLibrary.Net\Dns\DnsClient.cs:line 4212
--- End of stack trace from previous location ---
at TechnitiumLibrary.Net.Dns.DnsClient.<>c__DisplayClass67_0.<g__DoResolveAsync|1>d.MoveNext() in Z:\Technitium\Projects\TechnitiumLibrary\TechnitiumLibrary.Net\Dns\DnsClient.cs:line 3962
--- End of stack trace from previous location ---
at TechnitiumLibrary.Net.Dns.DnsClient.InternalResolveAsync(DnsDatagram request, CancellationToken cancellationToken) in Z:\Technitium\Projects\TechnitiumLibrary\TechnitiumLibrary.Net\Dns\DnsClient.cs:line 4312
at TechnitiumLibrary.Net.Dns.DnsClient.RecursiveResolveAsync(DnsQuestionRecord question, IDnsCache cache, NetProxy proxy, Boolean preferIPv6, UInt16 udpPayloadSize, Boolean randomizeName, Boolean qnameMinimization, Boolean asyncNsRevalidation, Boolean dnssecValidation, NetworkAddress eDnsClientSubnet, Int32 retries, Int32 timeout, Int32 maxStackCount, Boolean cleanupResponse, Boolean asyncNsResolution, CancellationToken cancellationToken) in Z:\Technitium\Projects\TechnitiumLibrary\TechnitiumLibrary.Net\Dns\DnsClient.cs:line 1736
--- End of inner exception stack trace ---
at TechnitiumLibrary.Net.Dns.DnsClient.RecursiveResolveAsync(DnsQuestionRecord question, IDnsCache cache, NetProxy proxy, Boolean preferIPv6, UInt16 udpPayloadSize, Boolean randomizeName, Boolean qnameMinimization, Boolean asyncNsRevalidation, Boolean dnssecValidation, NetworkAddress eDnsClientSubnet, Int32 retries, Int32 timeout, Int32 maxStackCount, Boolean cleanupResponse, Boolean asyncNsResolution, CancellationToken cancellationToken) in Z:\Technitium\Projects\TechnitiumLibrary\TechnitiumLibrary.Net\Dns\DnsClient.cs:line 1736
at DnsServerCore.Dns.DnsServer.RecursiveResolveAsync(DnsQuestionRecord question, NetworkAddress eDnsClientSubnet, IReadOnlyList`1 conditionalForwarders, Boolean dnssecValidation, Boolean cachePrefetchOperation, Boolean cacheRefreshOperation, Boolean skipDnsAppAuthoritativeRequestHandlers, TaskCompletionSource`1 taskCompletionSource) in Z:\Technitium\Projects\DnsServer\DnsServerCore\Dns\DnsServer.cs:line 2899
This repeats
Thanks for asking. Yes, you should see data on dashboard for your local root server. Since, its not showing anything, it means that its not receiving any requests.
DeleteThe "no response from name servers [dns-root (127.0.0.2)]" error message indicate that the root server you are running is probably not listening on the IP and port. It could be that it failed to bind to that port for some reason which you can check by looking at its logs.
You can try querying to your local root server manually too using nslookup command and debug it. Use netstat command to confirm if the server is bound to the port.
I saw the same behaviour at first but have now correctly bound the server to the port. Technically this should now display traffic/data on the root server dashboard but it doesn’t. Interesting thing I noted is that the log file on the root server lists time in UTC and the time on the main server is shown as “local”. On the root server there is no ntp.org zone defined so I added one but the time in the log still displays as UTC. I’m thinking that there is no data on the root server as the times of the 2 servers are not in sync??
DeleteThe local time in logs is just an option in Settings > Logging section which you can enable. You do not need to have "ntp.org" forwarder zone except in cases when your server hardware does not have a real-time clock.
DeleteShreyas, your sc command for creation of the additional DNS Server instance for a Windows host should also have the parameter "start= auto" included, for automatic startup of the service (the default seems to be manual startup for sc create)
ReplyDeleteThanks for the suggestion. Will update the blog post.
DeleteQuestion, for a windows host - does the fact that because this configuration will result in 2 separate "Technitium DNS Server" services running at the same time, should any special consideration/care be taken during a version upgrade? Since both DNS services run using the same executable (the configuration folder is what differs between each)
ReplyDeleteOf course it is expected that the DnsServerSetup executable has to interact with the "original" windows service (stops it and starts it at the bare minimum)
No new versions were released after I upgraded my setup to include root hints with the 2nd service and I got wary that the upgrade itself could throw an error (because it did not stop the 2nd service and ran into an issue while trying to replace files) if I did not stop the 2nd service myself beforehand.
Thanks
Thanks for asking. On Windows, you will need to stop the 2nd DNS service that you manually created before installing the update. Once the update is installed, just start the service back manually to complete the update.
DeleteOn Linux, the files on disk will get updated by the installer and you will just need to restart the 2nd DNS service manually to load the latest version.
I have installed it on Linux in DNS log he says can not bind 53 and it doesnt work normally i want to use it for zen.spamhaus.org but if i test it with for example nslookup it says a failure in the web gui from seccond instance ther are no statistics only in first instance a querys from 127.0.0.1. if i testet nslookup heise.de for exampe i get an answer from 127.0.0.1 how i know that the second instance work normally. We need an own dns for DNSBL from the mailserver. and public dns servers are blocked because they have more then 100k querys
ReplyDeleteNot all deployments need to have a local root zone. So, you can just run the single instance for your setup without any issues.If you still want to have the local root zone then send details of your setup to support@technitium.com and you will get solution to fix the issue.
DeleteIs there a possibility to encrypt the data locally to maintain privacy against the ISP, the least?
ReplyDeleteIf you use encrypted DNS protocols then you can hide DNS traffic from ISP but when you connect to the websites, your ISP will know it. If you want privacy against ISP then you should use either VPN or Tor.
DeleteHello Developer.
ReplyDeleteThis is wonderful DNS server tool. i have couple of queries.
1) After setting up root server in the server all the queries is going to secondary server. x.x.x.x:5381. there is no data on x.x.x.x:5380
2) can i publish this server on internet and use this as public dns.
Thanks for the compliments.
DeleteThe queries cannot go to the second server that is running root zone since it is listening on loopback IP address. If you see any client queries there then it means the local address is not set correctly. Just confirm your config once and test again.
You can make the server available on the Internet but its not recommended unless you plan to actively monitor it daily. You must also make sure to set query rate limiting using the QPM options in the Settings > General section to mitigate any abuse. You will need to use the Drop Request app to be able to drop common DNS amplification attacks.
Hello,
ReplyDeletei have setup root server in the same server. but all the traffic goes to x.x.x.x:5381 instead of x.x.x.x:5380
The queries cannot go to the second server that is running root zone since it is listening on loopback IP address. If you see any client queries there then it means the local address is not set correctly. Just confirm your config once and test again.
DeleteHello Shreyas,
DeleteI didn't do the last part of glue record. and 127.0.0.2 record for forwarder to root.
It worked. thanks for quick response.
Good to know that its working now.
Deleteany resources to learn configeration guide
ReplyDeleteApart from the blog posts that are available, there is unfortunately no documentation or guides available at the moment.
Deleteplease provide /share reference documentation or guides to utilize available features on dns server for new comer
ReplyDeleteApart from the blog posts that are available, there is unfortunately no documentation or guides available at the moment.
Deleteat least DNS appstore app guide
ReplyDeleteDNS Apps are planned to have GUI so that will help configure the apps with some basic info on the fields.
Deletehow to auto update dhcp records in dns
ReplyDeletemy dhcp server run on router
For that DHCP server must have support for Dynamic Updates (RFC 2136). Home wifi routers do not have that feature so it wont work. For home routers, configure domain name option in your DHCP server and then create conditional forwarder zone in your Technitium DNS server to forward request to your router. If you need more help then send details of your setup to support@technitium.com.
DeleteThanks for asking. The root servers listed in the blog post are as per the RFC 8806 list. Other root servers may have started to allow zone transfer too but since they are not listed in the RFC, there is no guarantee that their support will continue.
ReplyDeleteThe page number depends on the records per page option you select and the total records in the zone. There are 13362 records currently in root zone so if records per page is set to 10 then you get total 1337 pages.
Thanks for your response! I'll leave it with the RFC list then.
DeleteThat means 10 is a good number haha. Great software overwall. I've replaced a constantly breaking PiHole that was superseded by Adguard + Unbound which is now Technitium + Technitium!. This is honestly incredible. Amazing work.
Good to know that! Thanks for the compliments.
DeleteVery welcome! I've actually discovered an issue I might need a hand with. I've got my first two instances setup on unRAID in docker in this configuration and they're working perfectly. I've just set up a new Raspberry Pi 5 and installed another 2 instances in this configuration there for high availability via the Linux instructions.
DeleteThe setup is working fine until the Pi is rebooted. It seems no queries are being received until I press Save on the Settings > General page on instance 1 and I've narrowed it down to the endpoints seemingly not sticking.
The endpoints still show as:
127.0.0.1:53
192.168.0.85:53
But until I press save on that page at every reboot, I can only guess that those aren't the endpoints being used on boot. How do I prevent this from happening?
Thanks for the feedback. Please check the DNS Logs from the admin panel to see if there were any errors logged when the DNS server started. This would give clues on what went wrong. It could be that the network was not available when the DNS Server started and thus it did not bind to the interface IP address. So, when you manually save settings, it attempts to bind again and then succeeds since network is available this time.
DeleteThanks for your swift response. You may indeed be correct. I'm seeing this:
Delete[2024-08-20 08:07:58 UTC] [192.168.0.85:53] [TCP] DNS Server failed to bind.
System.Net.Sockets.SocketException (99): Cannot assign requested address
at System.Net.Sockets.Socket.DoBind(EndPoint endPointSnapshot, SocketAddress socketAddress)
at System.Net.Sockets.Socket.Bind(EndPoint localEP)
at DnsServerCore.Dns.DnsServer.StartAsync() in Z:\Technitium\Projects\DnsServer\DnsServerCore\Dns\DnsServer.cs:line 4405
Do you have experience with delaying the start time? I'm quite new to the Pi, and I assume I'll have to delay both instances?
You can use [::] as the local end point so that it always work even when network is not available. If you still need to use the interface specific address then you will need to delay the DNS service from starting.
DeleteOn Linux you can configure the dns.service systemd service file to delay start as explained here: https://stackoverflow.com/questions/43001223/how-to-ensure-that-there-is-a-delay-before-a-service-is-started-in-systemd
Thanks for asking. It seems that your ISP is hijacking your DNS requests which is why you are getting Refused response code. In that case, there is no way you can setup local root zone.
ReplyDeleteNot sure where to go here. I've installed 13.1 as a fresh installation and created the secondary zone with the new ZONEMD option checked. Below is what I see in the logs and the root zone doesn't populate.
ReplyDelete[2024-10-24 21:14:48 UTC] DNS Server failed to refresh '' Secondary zone from: 192.0.47.132, 192.0.32.132, 199.9.14.201, 192.33.4.12, 199.7.91.13, 192.5.5.241, 192.112.36.4, 193.0.14.129
System.IO.IOException: Unable to read data from the transport connection: An existing connection was forcibly closed by the remote host..
---> System.Net.Sockets.SocketException (10054): An existing connection was forcibly closed by the remote host.
--- End of inner exception stack trace ---
Thanks for the details. It seems like your ISP/network is blocking the zone transfer request. If that's true then there is nothing that can be done.
Delete[2024-11-26 18:14:36 UTC] DNS App [Query Logs (Sqlite)]: System.IO.FileNotFoundException: Could not load file or assembly 'SQLitePCLRaw.core, Version=2.1.6.2060, Culture=neutral, PublicKeyToken=1488e028ca7ab535'. The system cannot find the file specified.
DeleteFile name: 'SQLitePCLRaw.core, Version=2.1.6.2060, Culture=neutral, PublicKeyToken=1488e028ca7ab535'
at System.Reflection.RuntimeAssembly.GetExportedTypes()
at DnsServerCore.Dns.DnsApplicationAssemblyLoadContext..ctor(IDnsServer dnsServer) in Z:\Technitium\Projects\DnsServer\DnsServerCore\Dns\Applications\DnsApplicationAssemblyLoadContext.cs:line 128
[2024-11-26 18:14:37 UTC] DNS Cache was loaded from disk successfully.
[2024-11-26 18:14:38 UTC] DNS Server successfully loaded DNS application: Query Logs (Sqlite)
[2024-11-26 18:14:39 UTC] [[::]:5380] [HTTP] Web Service was bound successfully.
[2024-11-26 18:14:39 UTC] [0.0.0.0:53] [UDP] DNS Server was bound successfully.
[2024-11-26 18:14:39 UTC] [0.0.0.0:53] [TCP] DNS Server was bound successfully.
[2024-11-26 18:14:39 UTC] [[::]:53] [UDP] DNS Server was bound successfully.
[2024-11-26 18:14:39 UTC] [[::]:53] [TCP] DNS Server was bound successfully.
[2024-11-26 18:14:39 UTC] DHCP Server successfully loaded scope: Default
[2024-11-26 18:14:39 UTC] DHCP Server successfully loaded scope file: /etc/dns/scopes/Default.scope
[2024-11-26 18:14:39 UTC] DNS Server (v13.2.0.0) was started successfully.
[2024-11-26 18:14:40 UTC] DNS Server read block list file (421600 domains) from: file:///etc/dns/blocklists/blacklist.txt
[2024-11-26 18:14:40 UTC] DNS Server is reading block list from: file:///etc/dns/blocklists/blocklist.txt
[2024-11-26 18:14:40 UTC] DNS Server read block list file (19 domains) from: file:///etc/dns/blocklists/blocklist.txt
[2024-11-26 18:14:41 UTC] DNS Server block list zone was loaded successfully.
[2024-11-26 18:14:45 UTC] DNS Server has started automatic update check for DNS Apps.
[2024-11-26 18:14:46 UTC] DNS Server auth config file was saved: /etc/dns/auth.config
[2024-11-26 18:16:34 UTC] [192.168.1.24:56901] [admin] Blocked zone was deleted: youtube.com
[2024-11-26 18:16:42 UTC] DNS Server failed to resolve the request '1.0.24.172.in-addr.arpa. PTR IN'.
TechnitiumLibrary.Net.Dns.DnsClientNoResponseException: DnsClient failed to recursively resolve the request '1.0.24.172.in-addr.arpa. PTR IN': no response from name servers [localhost (127.0.0.2)].
---> TechnitiumLibrary.Net.Dns.DnsClientNoResponseException: DnsClient failed to resolve the request '1.0.24.172.in-addr.arpa. PTR IN': request timed out for name server [localhost (127.0.0.2)].
---> System.Net.Sockets.SocketException (110): Connection timed out
at TechnitiumLibrary.Net.SocketExtensions.UdpQueryAsync(Socket socket, ArraySegment`1 request, ArraySegment`1 response, IPEndPoint remoteEP, Int32 timeout, Int32 retries, Boolean expBackoffTimeout, Func`2 isResponseValid, CancellationToken cancellationToken) in Z:\Technitium\Projects\TechnitiumLibrary\TechnitiumLibrary.Net\SocketExtensions.cs:line 141
at TechnitiumLibrary.Net.Dns.ClientConnection.UdpClientConnection.QueryAsync(DnsDatagram request, Int32 timeout, Int32 retries, CancellationToken cancellationToken) in Z:\Technitium\Projects\TechnitiumLibrary\TechnitiumLibrary.Net\Dns\ClientConnection\UdpClientConnection.cs:line 271
--- End of inner exception stack trace ---
at TechnitiumLibrary.Net.Dns.ClientConnection.UdpClientConnection.QueryAsync(DnsDatagram request, Int32 timeout, Int32 retries, CancellationToken cancellationToken) in Z:\Technitium\Projects\TechnitiumLibrary\TechnitiumLibrary.Net\Dns\ClientConnection\UdpClientConnection.cs:line 280
at TechnitiumLibrary.Net.Dns.DnsClient.<>c__DisplayClass93_0.<g__DoResolveAsync|1>d.MoveNext() in Z:\Technitium\Projects\TechnitiumLibrary\TechnitiumLibrary.Net\Dns\DnsClient.cs:line 4558
--- End of stack trace from previous location ---
If you are running older version of OS like Ubuntu server below 20.04 then the Query Logs (Sqlite) app will not work since it the sqlite drivers is not supported on older OSes.
DeleteDoes the root zone need to be accessible publicly? Or can I have a secondary ROOT Zone just be in my LAN?
ReplyDeleteThe root zone is use locally by the DNS server itself. So, its not really required to be publicly accessible.
DeleteHi thanks for your help. I read this blog and all the updates you posted. Since the Oct 2024 update do you still need to run two servers to make this work?
ReplyDeleteThanks for asking. No need to run two servers as described in the blog post. You can now just run a single server and use the "Secondary ROOT Zone" option when adding the root zone. This is possible now since root zone has deployed ZONEMD record which is now used by the DNS server to validate all the root zone records to make sure that you have received the untampered copy of the root zone.
DeleteHello...
DeleteI would like to know if there is any problem with the recursive operation when using Debian12.
I have tried to use it as recursive in more than one installation, but when I do not use forward I always receive the messages below:
; <<>> DiG 9.18.33-1~deb12u2-Debian <<>> @127.0.0.1 google.com
; (1 server found)
;; global options: +cmd
;; Got answer:
;; ->>HEADER<<- opcode: QUERY, status: SERVFAIL, id: 13338
;; flags: qr rd ra; QUERY: 1, ANSWER: 0, AUTHORITY: 0, ADDITIONAL: 1
;; OPT PSEUDOSECTION:
; EDNS: version: 0, flags:; udp: 1232
; EDE: 0 (Other): (Resolver exception)
;; QUESTION SECTION:
;google.com. IN A
;; Query time: 8 msec
;; SERVER: 127.0.0.1#53(127.0.0.1) (UDP)
;; WHEN: Fri May 02 22:20:39 -03 2025
;; MSG SIZE rcvd: 63
@Adnaldo Thanks for asking. The recursive resolution does not depend on the OS and not related to Debian. The response you shared says "resolver exception" so it seems to be some kind of error that is causing this response. Please check the error logs from the Logs > View Logs section on the admin panel and see if there are any errors related to your queries. Please share it here or send them to support@technitium.com to know the issue and get solution to fix it.
DeleteI am trying to setup a local root server using the secondary root zone function but I keep getting this error in the log. I can´t seem to find what the error is pointing towards.
ReplyDeleteDNS Server failed to refresh '' Secondary zone from: 199.9.14.201, 192.33.4.12, 199.7.91.13, 192.5.5.241, 192.112.36.4, 193.0.14.129, 192.0.47.132, 192.0.32.132, [2001:500:200::b], [2001:500:2::c], [2001:500:2d::d], [2001:500:2f::f], [2001:500:12::d0d], [2001:7fd::1], [2620:0:2830:202::132], [2620:0:2d0:202::132]
TechnitiumLibrary.Net.Dns.DnsClientException: Duplicate OPT record was found.
Thanks for the feedback. The issue will be fixed with an update scheduled for tomorrow. Root zone contents do not change frequently so you can let it be as-is till then.
Delete