Updated: 10 Jul 2025
Technitium DNS Server is build to be cross platform using the .NET. You can run the DNS Server Portable App on Windows, Linux, or macOS by using ASP.NET Core 8 Runtime. Raspberry Pi with an arm7 CPU is supported and thus both Raspberry Pi 1 and Raspberry Pi Zero which have arm6 CPU are not supported.
This post is written for Ubuntu Linux but, you can easily follow similar steps on your favorite distro.
This blog post is updated regularly to provide latest instructions to install the DNS Server. So, refer it when you are about to do a fresh installation.
Using Automated Installer / Updater
Automated installer script can be used to install or update the DNS Server. The automated installer script has been tested on following distros:
- Ubuntu Server (x64)
- Ubuntu Desktop (x64)
- Raspbian (Buster) (ARM32)
- CentOS 8.2 (2004) (x64)
- Fedora Server 32 (x64)
curl -sSL https://download.technitium.com/dns/install.sh | sudo bash
NOTE! If you have a firewall installed, you will need to allow these ports manually:
- 5380/tcp (for web console access)
- 53443/tcp (for web console HTTPS access)
- 53/udp (default DNS service)
- 53/tcp (default DNS service)
- 853/udp (DNS-over-QUIC service)
- 853/tcp (DNS-over-TLS service)
- 443/udp (DNS-over-HTTPS service over HTTP/3)
- 443/tcp (DNS-over-HTTPS service over HTTP/1.1 and HTTP/2)
- 80/tcp (DNS-over-HTTP service for reverse proxy or certificate renewal HTTP challenge)
- 67/udp (if you plan to use the built-in DHCP server)
Using Automated Uninstaller
Automated uninstaller script can be used to remove the DNS Server that was installed using the above automated installer script. The uninstaller script will remove both the DNS Server and .NET runtime.
curl -sSL https://download.technitium.com/dns/uninstall.sh | sudo bash
NOTE: The uninstaller will set your /etc/resolv.conf file to use 8.8.8.8 and 1.1.1.1 DNS servers. To restore the defaults follow the steps for your distro:
-
Ubuntu Server, Ubuntu Desktop, CentOS, or Fedora
sudo systemctl enable systemd-resolved
sudo systemctl start systemd-resolved
sudo rm /etc/resolv.conf
sudo ln -s /run/systemd/resolve/stub-resolv.conf /etc/resolv.conf
The above steps will restore the default systemd-resolved setup. -
Raspbian (Buster)
sudo rm /etc/resolv.conf
sudo resolvconf -ul
The above steps will restore the default resolvconf setup.
Deploying Docker Container
You can install the DNS Server using the official Docker image available on Docker Hub.
Download the docker-compose.yml file and edit it as per your deployment requirements. Once the file is ready, run the following commands to create a new Docker container using the docker-compose.yml file as shown below:
docker compose up -d
To update an existing container, run the following commands:
docker compose down
docker image rm technitium/dns-server
docker compose up -d
Note! You need to ensure that the docker container is listening on 53/tcp and 53/udp ports on the host system. If the ports are already occupied by stub resolvers like dnsmasq or systemd-resolved then you need to stop them as explained later in this post.
Installing DNS Server Manually
Install the ASP.NET Core 8 Runtime using the package manager instructions provided here. If you want to install ASP.NET Core Runtime on Raspberry Pi, use the instructions in this blog post to install it manually.
Once you have installed ASP.NET Core Runtime, start Terminal or SSH into the server and follow the steps below to install DNS Server on Ubuntu:
- Download DNS Server portable app using wget and extract it.
wget https://download.technitium.com/dns/DnsServerPortable.tar.gz
sudo mkdir -p /opt/technitium/dns
sudo tar -zxf DnsServerPortable.tar.gz -C /opt/technitium/dns
-
You can now run the DNS Server directly from console as a standalone app.
cd /opt/technitium/dns
sudo ./start.sh
- Or, if your distro uses systemd, follow these steps to install it as a daemon.
sudo cp /opt/technitium/dns/systemd.service /etc/systemd/system/dns.service
sudo systemctl enable dns.service
sudo systemctl start dns.service
You may want to check the systemd log entries to find issue if the daemon fails to start:
journalctl --unit dns --follow
- Open the url
http://<server-ip-address>:5380/to access the web console.
Updating DNS Server Manually
Make sure you got the ASP.NET Core 8 Runtime installed using the package manager instructions provided here. Start Terminal and follow the steps below to update DNS Server on Ubuntu:
- Download DNS Server portable app using wget and extract it.
wget https://download.technitium.com/dns/DnsServerPortable.tar.gz
sudo tar -zxf DnsServerPortable.tar.gz -C /opt/technitium/dns
- If your distro uses systemd, follow these steps to restart the DNS Server daemon.
sudo systemctl restart dns.service
You may want to check the systemd log entries to find issue if the daemon fails to start:
journalctl --unit dns --follow
- Open the url
http://<server-ip-address>:5380/to access the web console.
Note! The installation folder has been changed from the old "/etc/dns" to "/opt/technitium/dns" in the above instructions. You must extract the files into the folder in which you have the DNS server installed.
Common Issue With Ubuntu
If you are using Ubuntu Desktop, you may find dnsmasq or systemd-resolved daemon already running on UDP port 53 preventing the DNS Server to listen on the same port. You can check the DNS Server log file from the web console to confirm the issue by finding this error:
[2019-01-01 07:30:59 UTC] [0.0.0.0:53] System.Net.Sockets.SocketException (98): Address already in use
   at System.Net.Sockets.Socket.UpdateStatusAfterSocketErrorAndThrowException(SocketError error, String callerName)
   at System.Net.Sockets.Socket.DoBind(EndPoint endPointSnapshot, SocketAddress socketAddress)
   at System.Net.Sockets.Socket.Bind(EndPoint localEP)
   at DnsServerCore.DnsServer.Start() in Z:\Technitium\Projects\DnsServer\DnsServerCore\DnsServer.cs:line 811
You may confirm if its dnsmasq or systemd-resolved by running sudo netstat -nlpu command.
Follow these steps below to disable the dnsmasq service:
- Edit the NetworkManager.conf file to disable dnsmasq service:
sudo nano /etc/NetworkManager/NetworkManager.conf
Comment out the dns=dnsmasq line by adding # character at the beginning like this #dns=dnsmasq and exit the editor by pressing CTRL+X and enter y to save the file. -
Restart the computer to apply changes as shown below:
sudo reboot now
- After system reboot, open Terminal and check DNS Server logs again from the web console.
Follow these steps below to disable the systemd-resolved service:
- Disable the systemd-resolved service and stop it:
sudo systemctl disable systemd-resolved
sudo systemctl stop systemd-resolved
-
Configure /etc/resolv.conf as shown below:
sudo rm /etc/resolv.conf
sudo echo "nameserver 127.0.0.1" > /etc/resolv.conf
-
If you are using Ubuntu Desktop then edit your /etc/NetworkManager/NetworkManager.conf using nano:
sudo nano /etc/NetworkManager/NetworkManager.conf
Put the following line in the [main] section of your /etc/NetworkManager/NetworkManager.conf as shown below:[main] dns=default
Restart network-manager:sudo service network-manager restart
- Now restart the DNS Server and check logs again from the web console.
sudo systemctl restart dns.service
Missing ICU Package
The DNS Server v13.4 update adds requirement for your OS to have ICU package installed. There wont be an issue with most systems since they include the ICU package by default but some "lite" Linux distros like DietPi may have issues since the do not include ICU package to save on space. On such systems, the DNS server will fail to start. You can run the following command to find out the exact reason:
journalctl --unit dns --follow
If the issue was due to missing ICU package, you will see error messages as shown below:
$ journalctl --unit dns --follow
Jan 29 16:58:27 server1 dns-server[240812]:    at System.Globalization.CultureData.get_Invariant()
Jan 29 16:58:27 server1 dns-server[240812]:    at System.Globalization.CultureInfo..cctor()
Jan 29 16:58:27 server1 dns-server[240812]:    at System.Globalization.CultureInfo.get_CachedCulturesByName()
Jan 29 16:58:27 server1 dns-server[240812]:    at System.Globalization.CultureInfo.GetCultureInfo(System.String)
Jan 29 16:58:27 server1 dns-server[240812]:    at System.Reflection.RuntimeAssembly.GetLocale()
Jan 29 16:58:27 server1 dns-server[240812]:    at System.Reflection.RuntimeAssembly.GetName(Boolean)
Jan 29 16:58:27 server1 dns-server[240812]:    at DnsServerCore.DnsWebService..ctor(System.String, System.Uri, System.Uri)
Jan 29 16:58:27 server1 dns-server[240812]:    at DnsServerApp.Program.Main(System.String[])
Jan 29 16:58:27 server1 systemd[1]: dns.service: Main process exited, code=killed, status=6/ABRT
Jan 29 16:58:27 server1 systemd[1]: dns.service: Failed with result 'signal'.
Jan 29 16:58:37 server1 systemd[1]: dns.service: Scheduled restart job, restart counter is at 4.
Jan 29 16:58:37 server1 systemd[1]: Stopped dns.service - Technitium DNS Server.
Jan 29 16:58:37 server1 systemd[1]: Started dns.service - Technitium DNS Server.
Jan 29 16:58:37 server1 dns-server[240820]: Process terminated. Couldn't find a valid ICU package installed on the system. Please install libicu (or icu-libs) using your package manager and try again. Alternatively you can set the configuration flag System.Globalization.Invariant to true if you want to run with no globalization support. Please see https://aka.ms/dotnet-missing-libicu for more information.
Jan 29 16:58:37 server1 dns-server[240820]:    at System.Environment.FailFast(System.String)
Jan 29 16:58:37 server1 dns-server[240820]:    at System.Globalization.GlobalizationMode+Settings..cctor()
Jan 29 16:58:37 server1 dns-server[240820]:    at System.Globalization.CultureData.CreateCultureWithInvariantData()
Jan 29 16:58:37 server1 dns-server[240820]:    at System.Globalization.CultureData.get_Invariant()
Jan 29 16:58:37 server1 dns-server[240820]:    at System.Globalization.CultureInfo..cctor()
Jan 29 16:58:37 server1 dns-server[240820]:    at System.Globalization.CultureInfo.get_CachedCulturesByName()
Jan 29 16:58:37 server1 dns-server[240820]:    at System.Globalization.CultureInfo.GetCultureInfo(System.String)
Jan 29 16:58:37 server1 dns-server[240820]:    at System.Reflection.RuntimeAssembly.GetLocale()
Jan 29 16:58:37 server1 dns-server[240820]:    at System.Reflection.RuntimeAssembly.GetName(Boolean)
Jan 29 16:58:37 server1 dns-server[240820]:    at DnsServerCore.DnsWebService..ctor(System.String, System.Uri, System.Uri)
Jan 29 16:58:37 server1 dns-server[240820]:    at DnsServerApp.Program.Main(System.String[])
Jan 29 16:58:37 server1 systemd[1]: dns.service: Main process exited, code=killed, status=6/ABRT
Jan 29 16:58:37 server1 systemd[1]: dns.service: Failed with result 'signal'.
You can fix this issue by installing the missing libicu package for your distro. Run the following command to find out the exact package name as shown below:
$ apt search libicu
Sorting... Done
Full Text Search... Done
icu-devtools/stable 72.1-3 arm64
  Development utilities for International Components for Unicode

libicu-dev/stable 72.1-3 arm64
  Development files for International Components for Unicode

libicu4j-4.4-java/stable,stable 4.4.2.2-4 all
  Library for Unicode support and internationalization

libicu4j-java/stable,stable 72.1-1 all
  Library for Unicode support and internationalization

libicu72/stable,now 72.1-3 arm64 [installed,automatic]
  International Components for Unicode
Install the missing libicu package by using the package name found in the previous command as shown below:
sudo apt install libicu72
Once the libicu package is installed, the DNS server would start working as expected.
Build From Source Code
You can also build the DNS server from source and install it manually by following the Build Instructions.
That's it!
The DNS Server is running and you can configure your network with the IP address of this computer for DNS resolution.
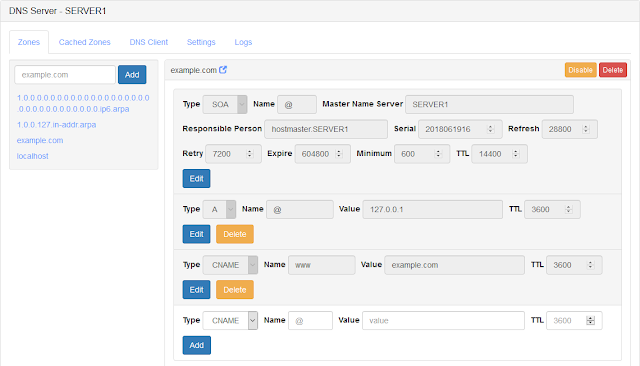
Check out the web console to create zone, check cached zones, access DNS client tool and configure server settings.
The DNS Server creates a folder named config in the current folder which contains the server config and zone files. Make sure you copy this folder while moving the DNS server folder if you want all the zone files and config to persist.
For any related queries, feel free to comment on this post.