Tuesday, January 1, 2019

Turn Raspberry Pi Into Network Wide DNS Server

Turn your Raspberry Pi into a network wide DNS server for security, privacy and blocking Internet Ads on your private network!

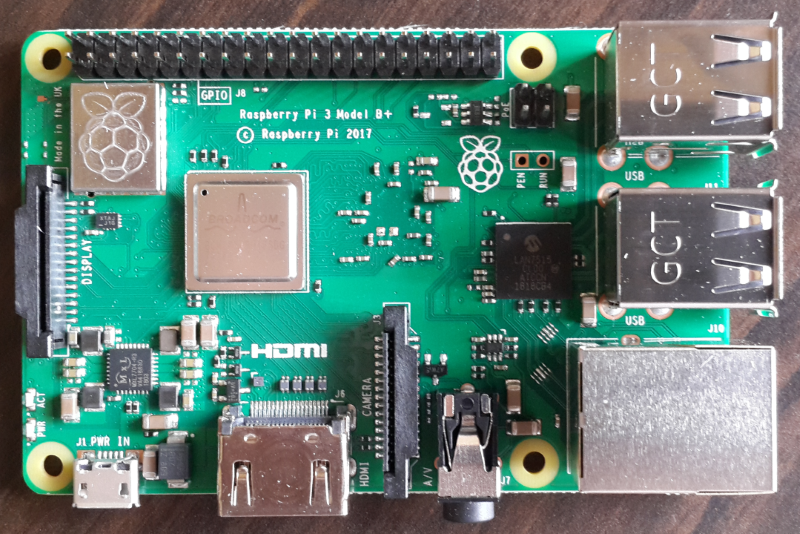
Raspberry Pi 3 Model B+

With Technitium DNS Server version 2.2 release, it is now possible to run it on Raspberry Pi (Raspbian Stretch) using .NET Core and we have a single line automatic installer ready to make it easy to get it running.

Install DNS Server

Just connect to your Raspberry Pi using SSH and run the command below to install the DNS server:

curl -sSL https://download.technitium.com/dns/install.sh | sudo bash

You can install the software manually too if you do not wish to directly run the install script. You will need to first manually install .NET Core on your Raspberry Pi and then use these steps to install the DNS Server.

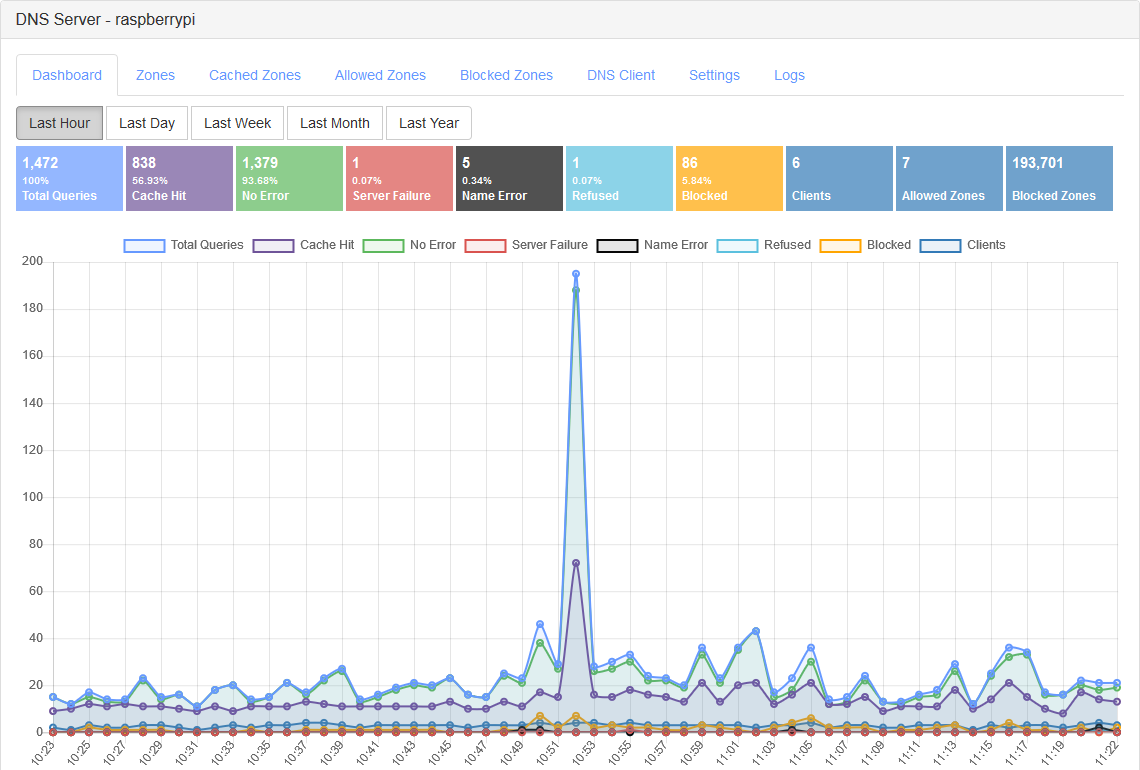
Once the installation is complete, open the DNS Server web console to view the dashboard and customize the settings.

Technitium DNS Server web console on Raspberry Pi 3 Model B+

Configure Your Router

To use it as a network wide DNS server, you need to configure your network router's DHCP settings and add your Raspberry Pi's IP address as a custom DNS server. You may also need to configure the WAN settings to override the default ISP provided DNS servers with your Raspberry Pi one. Check your router's manual for the configuration details.

Do make sure that your Raspberry Pi has a static IP address so that it does not change later causing issues with failed domain resolutions on the entire network. Also make sure to install heat sinks for your Raspberry Pi to prevent overheating issues since you will be running it round the clock.

If you have any queries or feedback, do comment below to let me know. You can also email your queries to support@technitium.com.

Quick And Easy Guide To Install .NET Core On Raspberry Pi

.NET Core is a cross-platform runtime available for x64 and ARM processors that can be used to run ASP.NET Core web applications and standalone .NET Core console applications on Windows, Linux and macOS.

Installing .NET Core is straight forward for most Desktop platforms with clear instructions available on the download website. However, many would find it trickier to install it on something like Raspberry Pi which uses ARM based processor. So, here is a quick and easy guide to install .NET Core 2.2 on Raspberry Pi 3 Model B+ with the latest Raspbian that is based on Debian 9 (Stretch).

Connect to your Raspberry Pi using SSH and get started!

Raspberry Pi 3 Model B+

Installing Dependencies

First you need to install a few dependencies required by the .NET Core runtime:

sudo apt-get -y update
sudo apt-get -y install curl libunwind8 gettext apt-transport-https

Installing .NET Core

Go to the .NET Core download page and download the Linux ARM32 runtime. Or you could just copy the download URL from there to use with wget like I did and follow these steps:

wget https://download.visualstudio.microsoft.com/download/pr/860e937d-aa99-4047-b957-63b4cba047de/da5ed8a5e7c1ac3b4f3d59469789adac/aspnetcore-runtime-2.2.0-linux-arm.tar.gz
sudo mkdir -p /opt/dotnet
sudo tar -zxf aspnetcore-runtime-2.2.0-linux-arm.tar.gz -C /opt/dotnet
sudo ln -s /opt/dotnet/dotnet /usr/bin

Now just enter dotnet on the command line to confirm.

Its Done!

Now you are ready to run ASP.NET Core or .NET Core console apps on your Raspberry Pi!

Tuesday, December 25, 2018

Configuring DNS-over-TLS and DNS-over-HTTPS with any DNS Server

The new DNS-over-TLS (DoT) and DNS-over-HTTPS (DoH) protocols are available for enabling end user's privacy and security given the fact that most DNS clients use UDP or TCP protocols which are prone to eavesdropping, vulnerable to Man-in-the-Middle (MitM) attacks and, are frequently abused by ISPs in many countries with Internet censorship.

Public DNS providers like Cloudflare & Quad9, have already deployed these protocols and web browsers like Mozilla Firefox has built in DoH support. However, most operating systems and applications do not support them but, end users can still use these protocols on their computer by installing Technitium DNS Server locally and configuring any DoT or DoH provider as a forwarder to bypass ISP's control over DNS.

Both these protocols are IETF standards and are equally secure considering the fact that HTTPS itself runs over TLS. However, both protocols have slightly different ideas and there are a lot of arguments between engineers over the reason why DoH protocol exists in first place when a superior DoT protocol exists that implements RFC 7766 guidelines. The argument of having DoH is more political since DNS requests over DoH look just like normal HTTPS traffic over port 443 and thus hard to stop unlike DoT running on port 853. This makes DoH protocol desirable to users in countries with Internet censorship.

In this post we will explore configuring both these protocols for any DNS server that you already have running on your network. Both these services require SSL certificates which can be obtained for free using Let's Encrypt certificate authority which is trusted by all major web browsers. You can configure Certbot for automatic Let's Encrypt certificate renewal or manually generate one using Get HTTPS For Free utility.

DNS-over-TLS (DoT)

DNS-over-TLS standard is specified in RFC 7858 which is very straight forward to implement. Essentially, the standard specifies to use the existing DNS-over-TCP protocol support, that most DNS servers already have and, add TLS to it. DoT support can be available as a addon feature in your DNS server software or you can use Nginx web server to enable it.

Nginx supports SSL termination for TCP upstream which I will be using to enable DoT to use with Technitium DNS Server. I am using Ubuntu Server 18.04 LTS for this setup but, you should be able to do similar config on any Linux distro.

First install the nginx web server:

sudo apt-get -y install nginx

Now all you need to configure DoT is to copy the following stream config block in your /etc/nginx/nginx.conf file and save the certificate and key files to path given as in the config. Don't forget to update the upstream DNS server IP addresses to your existing DNS servers.

stream {
    upstream dns-servers {
        server    10.10.1.5:53;
        server    10.10.1.6:53;
    }

    server {
        listen 853 ssl;
        proxy_pass dns-servers;

        ssl_certificate            /etc/nginx/ssl/dot-server.crt;
        ssl_certificate_key        /etc/nginx/ssl/dot-server.key;

        ssl_protocols        TLSv1.2;
        ssl_ciphers          HIGH:!aNULL:!MD5;
        
        ssl_handshake_timeout    10s;
        ssl_session_cache        shared:SSL:20m;
        ssl_session_timeout      4h;
    }
}

Once done, reload nginx web server to finish the configuration:

sudo service nginx reload

DNS-over-HTTPS (DoH)

DNS-over-HTTPS standard is specified in RFC 8484 and is a bit different to implement since it uses HTTP protocol. The DNS queries are send in wire format as a HTTP POST method or as a base64 encoded HTTP GET parameter. Using GET method allows caching of the response which may be undesirable considering that the DNS protocol controls expiry using TTL values which may get overridden by a HTTP based cache server.

Technitium has released DNS-over-HTTPS (DoH) open source web application that can be used with any DNS server. The ASP.NET 5 web application can be deployed on any supported platforms (Windows/macOS/Linux). Just follow the instructions on the project's GitHub page to get the DoH service running on your server.

And Its Ready!

You can now use the DoT service (dot.example.com:853) or DoH service (https://doh.example.com/dns-query) with any supported DNS client or as a forwarder with Technitium DNS Server.

If you have any queries or feedback, do comment below to let me know. You can also email your queries to support@technitium.com.

Saturday, October 27, 2018

Blocking Internet Ads Using DNS Sinkhole

Technitium DNS Server is an open source software that can be effectively used to block Internet Advertisements (Ads), adware, and malware on your computer or your local network using publicly available block lists.

Combined with DNS-over-TLS and DNS-over-HTTPS, Technitium DNS Server provides a good level security and privacy from network level DNS attacks and from adware. This makes it a must have tool if you are a privacy and security conscious person.

Technitium DNS Server is cross platform and works on Windows, Linux or macOS.

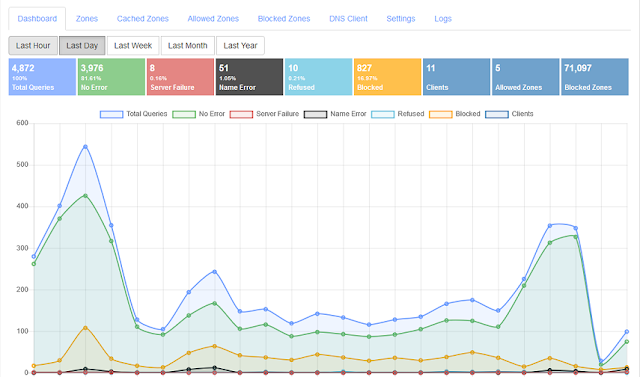
Technitium DNS Server v2.0

How Does It Work?
The Ad blocking feature works using the DNS Sinkhole method. With this feature enabled, for all the blocked domain names, the DNS Server will respond with 0.0.0.0 IPv4 address and :: for IPv6 address making the Ads fail to load making the website you visit free from Ads. This can not only block Ads but also adware, malware, social networks, porn etc. based on the block lists you configure in settings.

On your computer, you need to install the DNS Server and configure your network adapter's DNS settings to use the locally hosted DNS server. Once this is done, you need to configure the Block List URL settings to start blocking Ads. Once the DNS Server loads the block lists, it would respond with 0.0.0.0 IP address for the blocked websites making them fail to load.

You may also install the DNS Server on any spare computer on your network and configure your home or office router with IP address of this spare computer as DNS server in DHCP settings. With this setup, all your computers and devices like mobile phones would use the installed DNS Server blocking Ads and malware domains on all devices without installing any additional software on them.

Configuring Block Lists
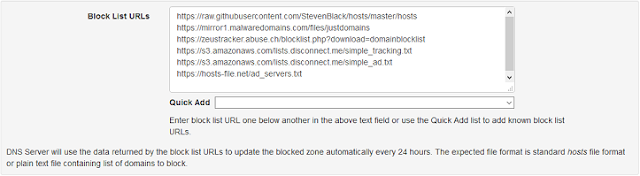
To enable Ad blocking, you need to configure Block List URLs in the settings. Known and popular block lists are already listed in the Quick Add drop down list from where you can just click and add those URLs.

Technitium DNS Server Block List Configuration

If you are not sure, just select the Default option from the Quick Add drop down list and a default set of block list URLs would get configured.

Once done, click the Save Settings button at the bottom of the page to save the changes and start the block list download background process. These configured block lists are automatically downloaded every 24 hours to keep the DNS Server blocked zone updated.

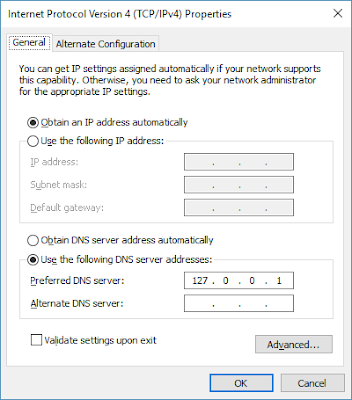
If you have the DNS server installed directly on your computer then don't forget to configure your network adapter's DNS server settings to 127.0.0.1 (for IPv4) and ::1 (for IPv6). Without these network configuration changes, the DNS Server wont get any queries to respond to and things wont work as intended.

If you setup the DNS server to be used on the network by all devices then do configure your router's DHCP config and set the IP address of the computer running the DNS server as the DNS for your network. By configuring the router's DHCP, you don't need to manually configure any of your devices on the network.

IPv4 DNS Server Network Configuration

IPv6 DNS Server Network Configuration

That's It!
Once the configuration is done, just check the Dashboard on the web console after a couple of minutes to see the number of blocked domains in the Blocked Zones widget. If there are too many block list URLs configured, it may take few more minutes for all of them to get downloaded and loaded.

If you have any further queries, do write them below as comments or send an email to support@technitium.com.

Saturday, June 23, 2018

Configuring DNS Server For Privacy & Security

Technitium DNS Server is an open source tool that can be used for blocking Internet Ads using DNS Sinkhole, self hosting a local DNS server for privacy & security or, used for experimentation/testing by software developers on their computer. It works out-of-the-box with no or minimal configuration and provides a user friendly web console accessible using any web browser.

With the release of Technitium DNS Server version 1.3 which adds support for DNS-over-TLS & DNS-over-HTTPS forwarders, it is now a good solution to be used by anyone concerned with privacy & security for domain name resolution on their Internet connection for Windows 10, Linux or macOS.

If you are not clear about what DNS is then read on. Domain Name System (DNS) is a decentralized system that allows you to find out the Internet Protocol (IP) address of any website (like www.technitium.com). So, when you enter a website domain name into your web browser, the web browser uses DNS to find out the IP address of that website. Once the IP address is known, the web browser can then connect to the web server on that IP address using TCP/IP protocols and download webpages and other embedded resources to display on to your screen. DNS servers don't just store IP address records but also store different types of records like mail exchange (MX) records which tell email servers where to deliver email for the recipient user of a given domain.

DNS servers and client use UDP or TCP protocol to exchange requests and responses which are not encrypted. This allows anyone on the network to see those requests and even hijack requests by sending back spoofed responses. There have been many instances reported in media of DNS hijacking done by malware, hacked home wifi routers or even by many Internet Service Providers (ISPs). ISPs in certain places have been found to redirect users to "custom" search pages instead of Google Search or even blatantly injecting Ads on websites that are not using HTTPS security. In some countries, ISPs often use their DNS servers to block websites to enforce government censorship orders.

To mitigate these issues, DNS-over-TLS and DNS-over-HTTPS protocols have been developed and are currently available to be used by a few DNS providers notably Cloudflare, Google and Quad9. But, currently, no operating system, applications or web browsers have built in support for these protocols.

With Technitium DNS Server installed on your computer (or on your network), you can make all your applications indirectly use these DNS providers with the new secure protocols hiding all your DNS traffic from your ISP. Lets see how to configure the DNS Server to use these services to take control and secure domain name resolution on your computer or private networks.

Technitium DNS Server is not configured out-of-the-box with these settings since you have to make a choice yourself of which DNS provider to use. All public DNS providers have their own privacy policies that you must understand before choosing it.

Cloudflare privacy policy promises that DNS query logs are only maintained for 24 hours with not personally identifiable data. They also promise to not sell the data to 3rd parties.

Google's privacy policy claims to maintain a temporary log for 24 to 48 hours which contains user's full IP address details. And a permanent log which redacts the personally identifiable data. There are no details mentioned how this data is used or whom its shared with.

Quad9's privacy policy promises that they do not keep any logs but, only anonymized statistical data on specific domain names which contains things like domain name, timestamp, geolocation, total hits, etc.

Below is a list of DNS providers grouped by the protocol they support. You can configure one or more DNS providers as forwarders but they must use the same protocol.

DNS-over-TLS protocol providers:
  • Cloudflare IPv4 {cloudflare-dns.com (1.1.1.1:853), cloudflare-dns.com (1.0.0.1:853)}
  • Cloudflare IPv6 {cloudflare-dns.com ([2606:4700:4700::1111]:853), cloudflare-dns.com ([2606:4700:4700::1001]:853)}
  • Google IPv4 {dns.google (8.8.8.8:853), dns.google (8.8.4.4:853)}
  • Google IPv6 {dns.google ([2001:4860:4860::8888]:853), dns.google ([2001:4860:4860::8844]:853)}
  • Quad9 Secure IPv4 {dns.quad9.net (9.9.9.9:853)}
  • Quad9 Secure IPv6 {dns.quad9.net ([2620:fe::fe]:853))

DNS-over-HTTPS protocol providers:
  • Cloudflare (https://cloudflare-dns.com/dns-query)
  • Google (https://dns.google/dns-query)
  • Quad9 Secure (https://dns.quad9.net/dns-query)

DNS-over-HTTPS (JSON) protocol providers:
  • Cloudflare (https://cloudflare-dns.com/dns-query)
  • Google (https://dns.google/resolve)
  • Quad9 Secure (https://dns.quad9.net/dns-query)

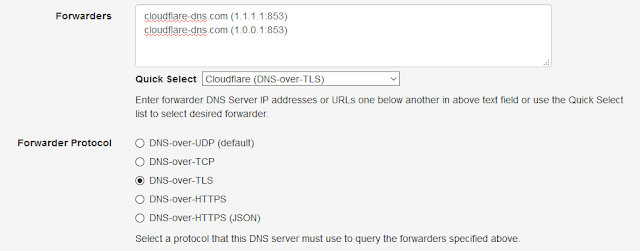
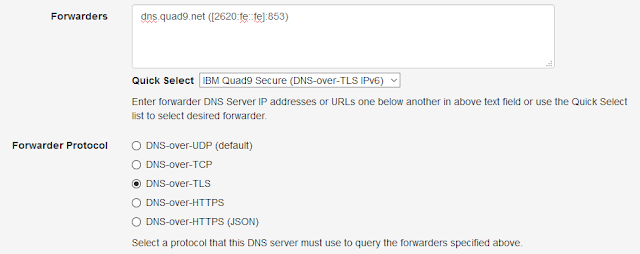
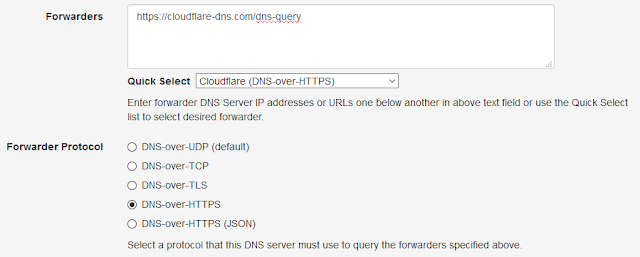
To make the configuration quick, easy and error free, there is Quick Select drop down list available which lists all the above options. Just selecting the desired option in the Quick Select list will populate the settings automatically for you.

See these examples below to know how the configuration looks like:

DNS-over-TLS Using Cloudflare

DNS-over-TLS Using Quad9 For IPv6 Internet

DNS-over-HTTPS Using Cloudflare

DNS-over-HTTPS (JSON) Using Google

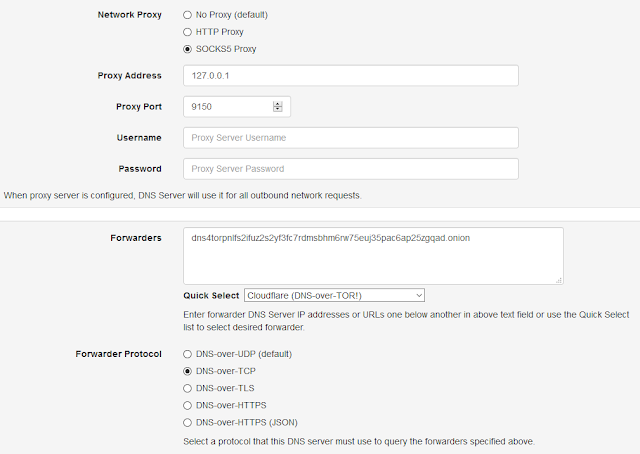
As you may have noticed, Cloudflare provides support for all three protocols. Not only that, it is possible to use Cloudflare DNS over Tor hidden service too! Technitium DNS Server v1.3 adds support for configuring proxy server which can of course be made to use Tor running on your computer and use Cloudflare DNS hidden service because WHY NOT?!

You just need to configure dns4torpnlfs2ifuz2s2yf3fc7rdmsbhm6rw75euj35pac6ap25zgqad.onion hidden service address as forwarder and since all hidden service requests over Tor network are inherently end-to end encrypted, you can use DNS-over-TCP protocol with it. Tor is not included with the software so you will need to install Tor separately and configure it as a SOCKS5 proxy.

This option hides your query from your ISP as well as hides your identity from Cloudflare. But seriously, if you are really that paranoid, just use Tor Browser for all your web browsing.

DNS-over-Tor Config For Cloudflare DNS Hidden Service

Once you have configured forwarders, make use of the DNS Client on the web console to test the setup by making a test query to "this-server". If everything is configured correctly, you will see the IP address for the test domain you entered inside the "Answers" section of the JSON formatted output.

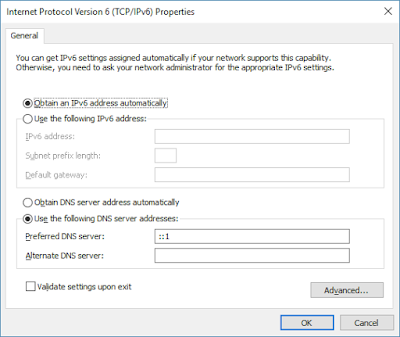
Finally, to make all your computers and applications to use Technitium DNS Server, you need to configure it on your Ethernet or WiFi network adapter. You just need to setup loopback IP address (127.0.0.1 for IPv4 & ::1 for IPv6) as DNS Server in your network adapter settings as shown below:

IPv4 DNS Server Network Configuration

IPv6 DNS Server Network Configuration

For more queries, write comments below or send an email to support@technitium.com.

Technitium DNS Server v1.3 Released!

Technitium DNS Server is an open source tool that can be used for self hosting a local DNS server for privacy & security or, used for experimentation/testing by software developers on their computer. It works out-of-the-box with no or minimal configuration and provides a user friendly web console accessible using any web browser.

Technitium DNS Server v1.3

Version 1.3 adds following awesome new features:

The DNS Server is cross platform and can be deployed on Windows 10, Linux or macOS (using .NET Core or Mono Framework). Read this blog post to learn how to run DNS Server on Ubuntu.

Nobody really bothers about domain name resolution since it works automatically behind the scenes and is complex to understand. Most computer software use the operating system's DNS resolver that usually query the configured ISP's DNS server using UDP protocol. This way works well for most people but, your ISP can see and control what website you can visit even when the website employ HTTPS security. Not only that, some ISPs can redirect, block or inject content into non-HTTPS websites you visit even when you use a different DNS provider like Google DNS or Cloudflare DNS. Having Technitium DNS Server configured to use DNS-over-TLS or DNS-over-HTTPS forwarders, these privacy & security issues can be mitigated very effectively.

Developers regularly use the hosts file for configuring an IP address for a domain under testing. However, using the hosts file is cumbersome at times and can only be used to resolve domain name to an IP address. With a fully configurable DNS server running on your local machine, you can configure not just simple A records (for IP address) but, also configure other types of records like CNAME or MX etc. This allow you to have more control and power when you want to do testing that simulates the exact configuration that you have running on production.

Technitium DNS Server is open source and available under GNU General Public Licence (GPL) v3 on GitHub.

Comments and feedback are things that help push new features and improve usability, and thus are most welcome. Send your feedback to support@technitium.com or write your comments below.

Friday, November 17, 2017

Running Technitium DNS Server on Ubuntu Linux

Updated: 5 May 2026

Technitium DNS Server is build to be cross platform using the .NET. You can run the DNS Server Portable App on Windows, Linux, or macOS by using ASP.NET Core 10 Runtime. Only Raspberry Pi with an arm7 CPU is supported and thus both Raspberry Pi 1 and Raspberry Pi Zero which have arm6 CPU are not supported.

This post is written for Ubuntu Linux but, you can easily follow similar steps on your favorite distro.

This blog post is updated regularly to provide latest instructions to install the DNS Server. So, refer it when you are about to do a fresh installation.

Using Automated Installer / Updater

Automated installer script can be used to install or update the DNS Server. The automated installer script has been tested on following distros:

  • Ubuntu Server (x64)
  • Ubuntu Desktop (x64)
  • Raspberry Pi OS (ARM32/ARM64)
  • CentOS 8.2 (2004) (x64)
  • Fedora Server 32 (x64)
The installer script may work on other distros and platforms as well.

curl -sSL https://download.technitium.com/dns/install.sh | sudo bash

NOTE! If you have a firewall installed, you will need to allow these ports manually:

  • 5380/tcp (for web console access)
  • 53443/tcp (for web console HTTPS access)
  • 53/udp (default DNS service)
  • 53/tcp (default DNS service)
  • 853/udp (DNS-over-QUIC service)
  • 853/tcp (DNS-over-TLS service)
  • 443/udp (DNS-over-HTTPS service over HTTP/3)
  • 443/tcp (DNS-over-HTTPS service over HTTP/1.1 and HTTP/2)
  • 80/tcp (DNS-over-HTTP service for reverse proxy or certificate renewal HTTP challenge)
  • 67/udp (if you plan to use the built-in DHCP server)

NOTE! For Clustering setup, make sure to upgrade all of the secondary nodes before upgrading the primary node.

Using Automated Uninstaller

Automated uninstaller script can be used to remove the DNS Server that was installed using the above automated installer script. The uninstaller script will remove both the DNS Server and .NET runtime.

curl -sSL https://download.technitium.com/dns/uninstall.sh | sudo bash

NOTE: The uninstaller will set your /etc/resolv.conf file to use 8.8.8.8 and 1.1.1.1 DNS servers. To restore the defaults follow the steps for your distro:

  • Ubuntu Server, Ubuntu Desktop, CentOS, or Fedora
    sudo systemctl enable systemd-resolved
    sudo systemctl start systemd-resolved
    sudo rm /etc/resolv.conf
    sudo ln -s /run/systemd/resolve/stub-resolv.conf /etc/resolv.conf
    
    The above steps will restore the default systemd-resolved setup.
  • Raspberry Pi OS
    sudo rm /etc/resolv.conf
    sudo resolvconf -ul
    
    The above steps will restore the default resolvconf setup.

Deploying Docker Container

You can install the DNS Server using the official Docker image available on Docker Hub.

Download the docker-compose.yml file and edit it as per your deployment requirements. Once the file is ready, run the following commands to create a new Docker container using the docker-compose.yml file as shown below:

docker compose up -d

To update an existing container, run the following commands:

docker compose down
docker image rm technitium/dns-server
docker compose up -d

Note! You need to ensure that the docker container is listening on 53/tcp and 53/udp ports on the host system. If the ports are already occupied by stub resolvers like dnsmasq or systemd-resolved then you need to stop them as explained later in this post.

Installing DNS Server Manually

Install the ASP.NET Core 10 Runtime using the package manager instructions provided here. If you want to install ASP.NET Core Runtime on Raspberry Pi, use the instructions in this blog post to install it manually.

Once you have installed ASP.NET Core Runtime, start Terminal or SSH into the server and follow the steps below to install DNS Server on Ubuntu:

  1. Download DNS Server portable app using wget and extract it.
    wget https://download.technitium.com/dns/DnsServerPortable.tar.gz
    sudo mkdir -p /opt/technitium/dns
    sudo tar -zxf DnsServerPortable.tar.gz -C /opt/technitium/dns
    
  2. You can now run the DNS Server directly from console as a standalone app.
    cd /opt/technitium/dns
    sudo ./start.sh
    
  3. Or, if your distro uses systemd, follow these steps to install it as a daemon.
    sudo mkdir /etc/dns
    sudo mkdir -p /var/log/technitium/dns
    sudo useradd --system -M --shell /usr/sbin/nologin dns-server
    sudo chown -R dns-server:dns-server /opt/technitium/dns /etc/dns /var/log/technitium/dns
    sudo cp /opt/technitium/dns/systemd.service /etc/systemd/system/dns.service
    sudo systemctl enable dns.service
    sudo systemctl start dns.service
    

    You may want to check the systemd log entries to find issue if the daemon fails to start:

    journalctl --unit dns --follow
    

  4. Open the url http://<server-ip-address>:5380/ to access the web console.

Updating DNS Server Manually

Make sure you got the ASP.NET Core 9 Runtime installed using the package manager instructions provided here. Start Terminal and follow the steps below to update DNS Server on Ubuntu:

  1. Download DNS Server portable app using wget and extract it.
    wget https://download.technitium.com/dns/DnsServerPortable.tar.gz
    sudo tar -zxf DnsServerPortable.tar.gz -C /opt/technitium/dns
    
  2. If your distro uses systemd, follow these steps to restart the DNS Server daemon.
    sudo systemctl restart dns.service
    

    You may want to check the systemd log entries to find issue if the daemon fails to start:

    journalctl --unit dns --follow
    

  3. Open the url http://<server-ip-address>:5380/ to access the web console.

Note! The installation folder has been changed from the old "/etc/dns" to "/opt/technitium/dns" in the above instructions. You must extract the files into the folder in which you have the DNS server installed.

Common Issue With Ubuntu

If you are using Ubuntu Desktop, you may find dnsmasq or systemd-resolved daemon already running on UDP port 53 preventing the DNS Server to listen on the same port. You can check the DNS Server log file from the web console to confirm the issue by finding this error:

[2019-01-01 07:30:59 UTC] [0.0.0.0:53] System.Net.Sockets.SocketException (98): Address already in use
   at System.Net.Sockets.Socket.UpdateStatusAfterSocketErrorAndThrowException(SocketError error, String callerName)
   at System.Net.Sockets.Socket.DoBind(EndPoint endPointSnapshot, SocketAddress socketAddress)
   at System.Net.Sockets.Socket.Bind(EndPoint localEP)
   at DnsServerCore.DnsServer.Start() in Z:\Technitium\Projects\DnsServer\DnsServerCore\DnsServer.cs:line 811

You may confirm if its dnsmasq or systemd-resolved by running sudo netstat -nlpu command.

Follow these steps below to disable the dnsmasq service:

  1. Edit the NetworkManager.conf file to disable dnsmasq service:
    sudo nano /etc/NetworkManager/NetworkManager.conf
    
    Comment out the dns=dnsmasq line by adding # character at the beginning like this #dns=dnsmasq and exit the editor by pressing CTRL+X and enter y to save the file.
  2. Restart the computer to apply changes as shown below:
    sudo reboot now
    
  3. After system reboot, open Terminal and check DNS Server logs again from the web console.

Follow these steps below to disable the systemd-resolved service:

  1. Disable the systemd-resolved service and stop it:
    sudo systemctl disable systemd-resolved
    sudo systemctl stop systemd-resolved
    
  2. Configure /etc/resolv.conf as shown below:
    sudo rm /etc/resolv.conf
    sudo echo "nameserver 127.0.0.1" > /etc/resolv.conf
    
  3. If you are using Ubuntu Desktop then edit your /etc/NetworkManager/NetworkManager.conf using nano:
    sudo nano /etc/NetworkManager/NetworkManager.conf
    
    Put the following line in the [main] section of your /etc/NetworkManager/NetworkManager.conf as shown below:
    [main]
    dns=default
    
    Restart network-manager:
    sudo systemctl restart NetworkManager
    
  4. Now restart the DNS Server and check logs again from the web console.
    sudo systemctl restart dns.service
    

Missing ICU Package

The DNS Server v13.4 update adds requirement for your OS to have ICU package installed. There wont be an issue with most systems since they include the ICU package by default but some "lite" Linux distros like DietPi may have issues since the do not include ICU package to save on space. On such systems, the DNS server will fail to start. You can run the following command to find out the exact reason:

journalctl --unit dns --follow 

If the issue was due to missing ICU package, you will see error messages as shown below:

$ journalctl --unit dns --follow
Jan 29 16:58:27 server1 dns-server[240812]:    at System.Globalization.CultureData.get_Invariant()
Jan 29 16:58:27 server1 dns-server[240812]:    at System.Globalization.CultureInfo..cctor()
Jan 29 16:58:27 server1 dns-server[240812]:    at System.Globalization.CultureInfo.get_CachedCulturesByName()
Jan 29 16:58:27 server1 dns-server[240812]:    at System.Globalization.CultureInfo.GetCultureInfo(System.String)
Jan 29 16:58:27 server1 dns-server[240812]:    at System.Reflection.RuntimeAssembly.GetLocale()
Jan 29 16:58:27 server1 dns-server[240812]:    at System.Reflection.RuntimeAssembly.GetName(Boolean)
Jan 29 16:58:27 server1 dns-server[240812]:    at DnsServerCore.DnsWebService..ctor(System.String, System.Uri, System.Uri)
Jan 29 16:58:27 server1 dns-server[240812]:    at DnsServerApp.Program.Main(System.String[])
Jan 29 16:58:27 server1 systemd[1]: dns.service: Main process exited, code=killed, status=6/ABRT
Jan 29 16:58:27 server1 systemd[1]: dns.service: Failed with result 'signal'.
Jan 29 16:58:37 server1 systemd[1]: dns.service: Scheduled restart job, restart counter is at 4.
Jan 29 16:58:37 server1 systemd[1]: Stopped dns.service - Technitium DNS Server.
Jan 29 16:58:37 server1 systemd[1]: Started dns.service - Technitium DNS Server.
Jan 29 16:58:37 server1 dns-server[240820]: Process terminated. Couldn't find a valid ICU package installed on the system. Please install libicu (or icu-libs) using your package manager and try again. Alternatively you can set the configuration flag System.Globalization.Invariant to true if you want to run with no globalization support. Please see https://aka.ms/dotnet-missing-libicu for more information.
Jan 29 16:58:37 server1 dns-server[240820]:    at System.Environment.FailFast(System.String)
Jan 29 16:58:37 server1 dns-server[240820]:    at System.Globalization.GlobalizationMode+Settings..cctor()
Jan 29 16:58:37 server1 dns-server[240820]:    at System.Globalization.CultureData.CreateCultureWithInvariantData()
Jan 29 16:58:37 server1 dns-server[240820]:    at System.Globalization.CultureData.get_Invariant()
Jan 29 16:58:37 server1 dns-server[240820]:    at System.Globalization.CultureInfo..cctor()
Jan 29 16:58:37 server1 dns-server[240820]:    at System.Globalization.CultureInfo.get_CachedCulturesByName()
Jan 29 16:58:37 server1 dns-server[240820]:    at System.Globalization.CultureInfo.GetCultureInfo(System.String)
Jan 29 16:58:37 server1 dns-server[240820]:    at System.Reflection.RuntimeAssembly.GetLocale()
Jan 29 16:58:37 server1 dns-server[240820]:    at System.Reflection.RuntimeAssembly.GetName(Boolean)
Jan 29 16:58:37 server1 dns-server[240820]:    at DnsServerCore.DnsWebService..ctor(System.String, System.Uri, System.Uri)
Jan 29 16:58:37 server1 dns-server[240820]:    at DnsServerApp.Program.Main(System.String[])
Jan 29 16:58:37 server1 systemd[1]: dns.service: Main process exited, code=killed, status=6/ABRT
Jan 29 16:58:37 server1 systemd[1]: dns.service: Failed with result 'signal'.

You can fix this issue by installing the missing libicu package for your distro. Run the following command to find out the exact package name as shown below:

$ apt search libicu
Sorting... Done
Full Text Search... Done
icu-devtools/stable 72.1-3 arm64
  Development utilities for International Components for Unicode

libicu-dev/stable 72.1-3 arm64
  Development files for International Components for Unicode

libicu4j-4.4-java/stable,stable 4.4.2.2-4 all
  Library for Unicode support and internationalization

libicu4j-java/stable,stable 72.1-1 all
  Library for Unicode support and internationalization

libicu72/stable,now 72.1-3 arm64 [installed,automatic]
  International Components for Unicode

Install the missing libicu package by using the package name found in the previous command as shown below:

sudo apt install libicu72

Once the libicu package is installed, the DNS server would start working as expected.

Build From Source Code

You can also build the DNS server from source and install it manually by following the Build Instructions.

That's it!

The DNS Server is running and you can configure your network with the IP address of this computer for DNS resolution.

Check out the web console to create zone, check cached zones, access DNS client tool and configure server settings.

The DNS Server creates a folder named config in the current folder which contains the server config and zone files. Make sure you copy this folder while moving the DNS server folder if you want all the zone files and config to persist.

For any related queries, feel free to comment on this post.
Technitium DNS Server Released!

Technitium DNS Server is an open source tool that allows anyone to run DNS server on their computer or local network. Its aimed towards software developers who like to simulate live production scenarios on their laptop or local network setup for testing or debugging purposes. However, it can be used for any DNS related requirement. Applications of using your own local DNS server is limited only by the your imagination!

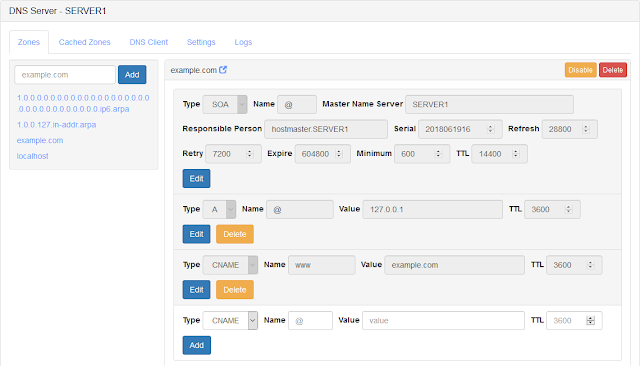
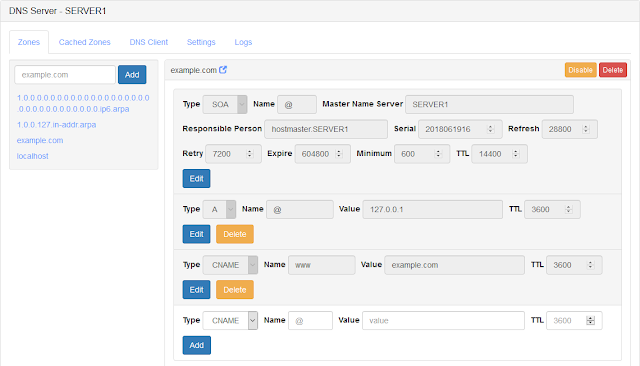
Technitium DNS Server Web Console

The DNS server is cross platform and can be deployed on Windows, Linux or macOS (using Mono Framework or .NET Core). The DNS portable console app allows running the service instantly with zero initial configuration, just run the executable and its ready. The DNS server provides web console access that allows it to be accessible over network.

A unique feature available with this server is to enable/disable hosted zones with a single click allowing switching between staging/testing setup to live production setup instantly. Once a zone is disabled, the DNS server will start recursively resolving the domain and use cached results. When the zone is enabled, the records hosted on the server override the cached results. This reduces a lot of efforts when trying to achieve similar thing using hosts file. Hosted records can be set with low TTL values to force the operating system DNS client to re-query.

The DNS server has many standard features like recursion, caching, wildcard sub domains, forwarders, IPv6 support etc. A very useful and frequently used feature is the DNS Client tool included with the web console. This DNS Client tool is a general purpose DNS resolver that can be used to query any name server accessible over the network. The DNS Client can also perform recursive query on its own and display results from the authoritative name server for the given domain. The recursive query feature saves time by automatically finding out the authoritative name servers via the root servers. DNS Client is also available as a separate online tool at dnsclient.net website.

Apart from just resolving queries, the DNS Client also provides a very useful feature to import records from the output of the query into the local DNS. This feature is really useful when you quickly want to copy existing records for a given domain. You can query with type ANY which would list out all possible records or use specific type needed, and import them in one go into the local server zone. You may then edit a few records with value that you need for testing and its ready to use. With query type ANY, its advised to use TCP protocol since the UDP protocol may not accommodate all the records resulting in a truncated response.

Technitium DNS Server include following features:

  • Fully manageable local DNS server.
  • Wildcard sub domain support.
  • Disable/Enable hosted zones for quick switching between staging & production.
  • DNS Client tool for resolving queries.
  • Import records feature allows to import records of live domain using DNS Client.
  • Recursive querying support.
  • Web console for allowing access over network.
  • DNS caching with cache viewer interface in web console.
  • Forwarders setup to allow chaining other DNS server to reduce response time.
  • IPv6 network support in DNS server core for querying.
  • Built-in system logs and query logs.
  • Cross platform implementation for running on Linux or macOS using Mono Framework or .NET Core.

There are many applications of having a self hosted local DNS server. Some of them are:

  • Software developers or web developers can simulate live setup without need to use hosts file.
  • Security researchers can use it in their lab setups for spoofing domain names while performing experiments.
  • Users can keep watch on domain being used by various applications using the Cached Zone listing.
  • Block certain domains to partially or fully fail a website/application feature. User can block domain by creating an empty zone such that the application/website using that domain can no longer get the right IP address to the server failing all requests.

It must be noted that this DNS server is not suitable to be used for production or any critical application. The software is released as alpha version denoting that its not yet stable and may have bugs.

Technitium DNS Server is open source and available under GNU General Public Licence (GPL) v3 on GitHub.

Comments and feedback are things that help push new features and improve usability, and thus are most welcome. Send your feedback to support@technitium.com or leave your comments below.

Sunday, July 23, 2017

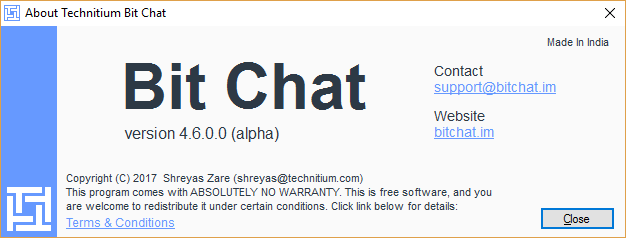
Bit Chat 4.6 Released

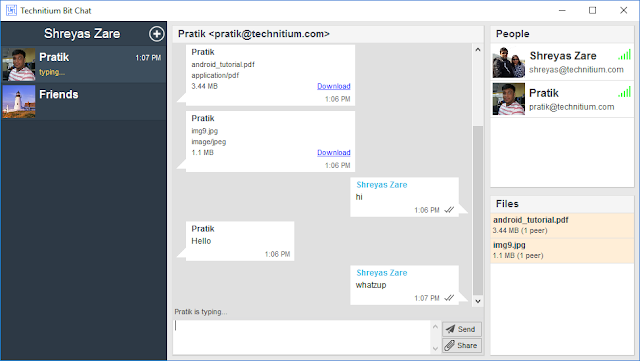
Technitium Bit Chat is a secure, peer-to-peer (p2p), open source instant messenger designed to provide end-to-end encryption. Primary aim of developing this instant messenger is to provide privacy which is achieved using strong cryptography. It can be used over Internet and private LAN networks for instant messaging and file transfer.

Bit Chat v4.6

Technitium Bit Chat version 4.6 (alpha) is available to download from the main website and via automatic update mechanism for existing installations. The software checks for new update automatically with every start but, you can also use the Check For Updates option in the main menu to get an update instantly.

Bit Chat v4.6 Released

The latest update has some protocol level changes that are not compatible with previous versions. Due to this, all peers will need to update to the latest version to be able to chat.

This update adds TCP based DHT protocol and removed UDP support totally. DHT over UDP faced issues with networks where inbound UDP packets are blocked over Internet. The Bit Chat protocol also adds a decoy HTTP GET requests to bypass application firewalls.

Know more about Bit Chat by reading Frequently Asked Questions (FAQ) and Bit Chat whitepaper. You can also view Bit Chat source code on GitHub and compile Bit Chat client yourself.

And as always, send your feedback to support@bitchat.im or write your comments below.

Saturday, November 26, 2016

Announcing Technitium DNS Client Service

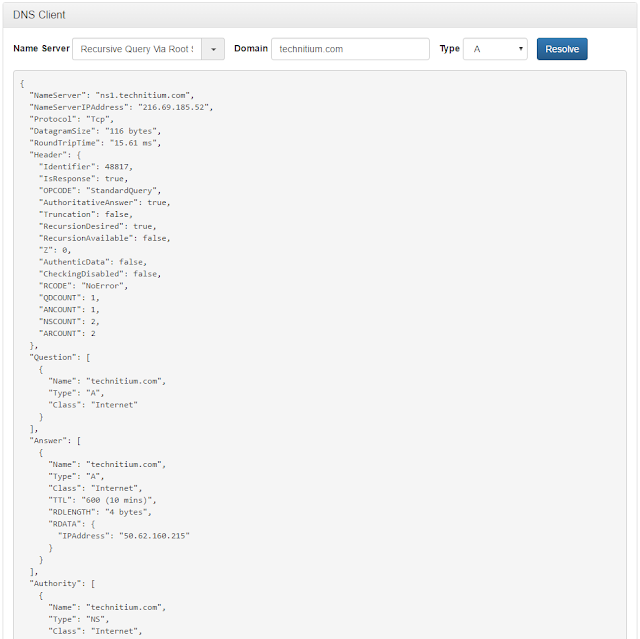
Technitium DNS Client is a simple domain name lookup service to quickly query any name server including root servers.

Technitium DNS Client

You can use it to confirm any DNS changes that you made to your domain. Selecting root server option to query a domain will, automatically resolve the authoritative name servers via root servers and get the response from them.

The response displayed is JSON formatted output of the DNS datagram which contains all necessary fields including fields from the header.

Technitium DNS Client is intended to be useful for domain administrators to verify the the changes they made to the zone with ease.

The source code for DNS Client is available on GitHub.

And as always, send your feedback to support@technitium.com or write your comments below.