Update (Oct 20, 2024): DNS server v13.1 now includes "Secondary ROOT Zone (RFC 8806)" option in Add Zone dialog reducing this entire blog post into a single click operation.
Update (Sept 28, 2024): With the release of v13 of DNS server, there is no need to follow this blog post's requirement to create a separate DNS server instance to run the secondary ROOT zone. The v13 update now supports ZONEMD validation and the ROOT zone also includes ZONEMD record making it possible to validate the ROOT zone directly. You can now create the secondary ROOT zone on your existing DNS server instance and enable the ZONEMD validation to automatically validate the ROOT zone contents after each zone transfer.
Update (June 11, 2022): The previous blog post instructed how to run a secondary root zone locally without DNSSEC considerations since the Technitium DNS Server version before v8.0 did not support DNSSEC. Now that DNSSEC is supported, it is highly recommended to update your local root zone deployments as per the the new instructions in this blog post. The new configuration changes comply with all the requirements in RFC 8806.
Introduction
A DNS recursive resolver is typically primed with a list of Root Servers which it uses to resolve queries. When the recursive resolver receives a query, it queries to one of the root servers to get back a list of top level domain (TLD) name servers. It then queries those TLD name servers to get back another list of name servers hosting the domain name. This process is done recursively until the an answer for the query is resolved.
The DNS recursive resolver maintains a cache to avoid frequent queries and thus improving its performance. However, when the cache expires or is flushed, the recursive resolution process is performed again.
During the recursive resolution process, there is a possibility that the response from root server is delayed due to network issues or other events like the root server being under a Denial of Service (DoS) attack. There could also be passive monitoring of DNS requests going to root servers by an on path actor compromising privacy.
To prevent these issues and to improve resiliency there is a good option to run a Root Server locally on your DNS resolver.
There are several advantages of running a Root Server locally:
- The Root zone contains all the TLD name servers and their IP addresses. This allows the DNS resolver to skip the initial query to the Root Server and directly query to the TLD name servers saving time.
- Since the Root zone is running locally, queries for non existent top level domain (TLD) names are resolved locally.
- This also improves resiliency since the Root zone is local and thus there is no immediate dependency on the Root Servers for recursive resolution.
There are a few disadvantages too:
- If there are any updates to the Root zone, it will take slightly longer for those changes to sync to your local Root zone. Though there wont be much of a noticeable issue.
- If your local Root zone is not updating due to any reason and it was not detected, then the local Root zone will expire after 7 days (as per Root SOA Expiry). This may cause some DNS resolvers to fail to resolve any queries when cache expires. Technitium DNS Server however will fall back to root hints in such a case.
Considering both the advantages and disadvantages, its good to have a Root zone locally for a recursive resolver.
Sourcing The Root Zone
The root zone is available from ICANN DNS servers via zone transfer (AXFR-over-TCP):
- xfr.cjr.dns.icann.org (192.0.47.132, 2620:0:2830:202::132)
- xfr.lax.dns.icann.org (192.0.32.132, 2620:0:2d0:202::132)
The following Root Servers also support zone transfer (AXFR-over-TCP):
- b.root-servers.net (199.9.14.201, 2001:500:200::b)
- c.root-servers.net (192.33.4.12, 2001:500:2::c)
- d.root-servers.net (199.7.91.13, 2001:500:2d::d)
- f.root-servers.net (192.5.5.241, 2001:500:2f::f)
- g.root-servers.net (192.112.36.4, 2001:500:12::d0d)
- k.root-servers.net (193.0.14.129, 2001:7fd::1)
It is recommended to have DNSSEC enabled on your DNS resolver. Use recursive ACL to make sure that your DNS resolver accepts queries only from known clients to protect from DNS amplification attacks.
Configuration
It is assumed here that you already have Technitium DNS Server installed and running on your server. To run the root zone locally, we need to run another instance of Technitium DNS Server on the same server. This second, local instance of the DNS server will answer requests only on loopback interface and thus wont be accessible from the network. The second DNS server instance will host the root secondary zone. Your currently running DNS server instance will query this second DNS server instance when root zone records are required.
While this blog post focuses on running the root server instance locally on the same server that is currently running your DNS server instance, it is possible to run it on a different server such that two or more DNS servers can be configured to use that single root server instance. The only thing that must be taken care of is to make sure that the root server instance is not used as a DNS server for normal domain lookups.
Note: Before proceeding, make sure to take a backup of the DNS server instance that you already have running in case you want to start over. You can create a backup zip file by clicking Backup Settings at the bottom right of the Settings section.
Creating A Second Local DNS Server Instance
Since, we need two DNS server instances running, the admin web console which runs by default on TCP 5380 port will cause a conflict. To prevent this, the second instance needs to be configure to run on a different port so we choose TCP 5381 for it. Follow the steps below to get the second instance running.
On Linux Installation:
-
Create a systemd service for running the second DNS server instance by
following the steps below:
Copy the systemd.service template as a new dns2.service systemd service:$ sudo cp /opt/technitium/dns/systemd.service /etc/systemd/system/dns2.service
Edit the dns2.service file in nano:$ sudo nano /etc/systemd/system/dns2.service
Explicitly specify a different config folder to use /etc/dns2 as shown below:[Unit] Description=Technitium DNS Server [Service] WorkingDirectory=/opt/technitium/dns ExecStart=/usr/bin/dotnet /opt/technitium/dns/DnsServerApp.dll /etc/dns2 Restart=always # Restart service after 10 seconds if the dotnet service crashes: RestartSec=10 KillSignal=SIGINT SyslogIdentifier=dns-server-2 [Install] WantedBy=multi-user.target
Exit nano saving the dns2.service file. - Login to the first DNS server instance by opening the url http://<server-ip-address>:5380/, go to Settings > Web Service section and change the Web Service HTTP Port to 5379 so that the default port is available temporarily for the second instance. Click on Save Settings button and the web console will automatically redirect you to the new DNS web console URL. Keep this tab open for later use.
-
Start the second DNS server instance:
$ sudo systemctl enable dns2.service
$ sudo systemctl start dns2.service
- Open the url http://<server-ip-address>:5380/ to access the web console of the second instance. Go to Settings > General section and set 127.0.0.2 as the DNS Server Local End Points replacing any existing values. Go to Settings > Web Service section and edit the Web Service HTTP Port to 5381 and click on Save Settings. The web console will automatically redirect you to the new URL.
- Switch to the first DNS server's web console tab that was kept open. Go to Settings > General section and set 127.0.0.1 and <server-ip-address> (use your actual server's IP address) as the DNS Server Local End Points replacing any existing values. Go to Settings > Web Service section and change the Web Service HTTP Port back to 5380 now that the second DNS server instance is running on port 5381. Click on Save Settings button and the web console will automatically redirect you to the new DNS web console URL.
On Windows Installation:
- Click on Start, type cmd, right click on the command prompt item and click Run as administrator to open CMD as an administrator.
-
Run the following command in CMD to create a Windows service for running the
second DNS server instance and explicitly provide the path to a different
config folder
C:\Program Files (x86)\Technitium\DNS Server\config2\ for use:
C:\Windows\system32> sc create DnsService2 binPath= "C:\Program Files (x86)\Technitium\DNS Server\DnsService.exe \"C:\Program Files (x86)\Technitium\DNS Server\config2\"" DisplayName= "Technitium DNS Server 2" start= auto
- Login to the first DNS server instance by opening the url http://<server-ip-address>:5380/, go to Settings > Web Service section and change the Web Service HTTP Port to 5379 so that the default port is available temporarily for the second instance. Click on Save Settings button and the web console will automatically redirect you to the new DNS web console URL. Keep this tab open for later use.
-
Start the second DNS server instance:
C:\Windows\system32> sc start DnsService2
- Open the url http://localhost:5380/ to access the web console of the second instance. Go to Settings > General section and set 127.0.0.2 as the DNS Server Local End Points replacing any existing values. Go to Settings > Web Service section and edit the Web Service HTTP Port to 5381 and click on Save Settings. The web console will automatically redirect you to the new URL.
- Switch to the first DNS server's web console tab that was kept open. Go to Settings > General section and set 127.0.0.1 and <server-ip-address> (use your actual server's IP address) as the DNS Server Local End Points replacing any existing values. Go to Settings > Web Service section and change the Web Service HTTP Port back to 5380 now that the second DNS server instance is running on port 5381. Click on Save Settings button and the web console will automatically redirect you to the new DNS web console URL.
Note: On Windows Server 2022, ensure that you do not enable the HTTP/3 protocol option from Settings > Web Service section. This is since the DNS server keeps thousands of UDP sockets open and it may happen that the port used for HTTP/3 may clash with an open UDP socket from the root zone instance causing the main DNS instance to fail to bind the web service on the same port when HTTP/3 is enabled.
On Docker:
-
Create a docker-compose.yml file in a folder with contents as show
below to create the first DNS server instance:
version: "3"
services:
  dns-server:
    container_name: dns-server
    hostname: dns-server
    image: technitium/dns-server:latest
    ports:
      - "5380:5380/tcp" #DNS web console
      - "127.0.0.1:53:53/udp" #DNS service
      - "127.0.0.1:53:53/tcp" #DNS service
      - "<server-ip-address>:53:53/udp" #DNS service
      - "<server-ip-address>:53:53/tcp" #DNS service
    environment:
      - DNS_SERVER_DOMAIN=dns-server #The primary domain name used by this DNS Server to identify itself.
    volumes:
      - config:/etc/dns
    restart: unless-stopped
volumes:
    config:
Note: You can edit your existing docker-compose.yml file that you used to run your existing container with above port changes and rebuild it. -
Click on Start, type cmd, right click on the command prompt item and
click Run as administrator to open CMD as an administrator. Navigate
to the folder where the docker-compose.yml exists using the
CD <folder-path> command. Run the following command to create
the docker container:
docker-compose up -d
-
Create a docker-compose.yml file in another folder with contents as
show below to create the second DNS server instance:
version: "3" services: dns-server: container_name: dns-server-2 hostname: dns-server-2 image: technitium/dns-server:latest ports: - "5381:5380/tcp" #DNS web console - "127.0.0.2:53:53/udp" #DNS service - "127.0.0.2:53:53/tcp" #DNS service environment: - DNS_SERVER_DOMAIN=dns-server-2 #The primary domain name used by this DNS Server to identify itself. volumes: - config2:/etc/dns restart: unless-stopped volumes: config2: -
Click on Start, type cmd, right click on the command prompt item and
click Run as administrator to open CMD as an administrator. Navigate
to the folder where the docker-compose.yml exists using the
CD <folder-path> command. Run the following command to create
the docker container:
docker-compose up -d
Configuring The Root Zone
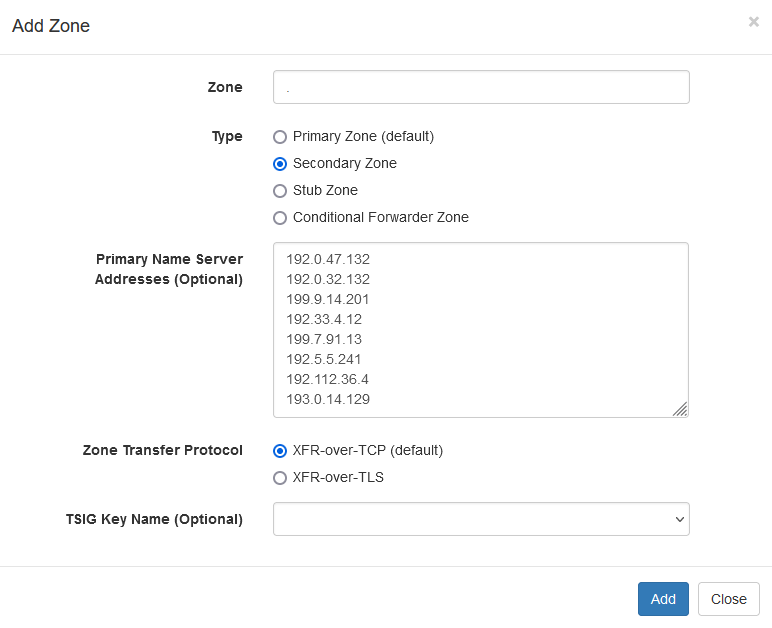
To configure the root zone, open the second instance web console at http://<server-ip-address>:5381/ and go to the Zones section. Click on the Add Zone button to create a secondary zone for . as the zone name. Enter the primary name server addresses as shown in the screenshot below:
|
|
Configuring Local Secondary Root Zone |
Once you have the secondary zone created, wait for a few seconds for the DNS server to perform the zone transfer. The Root zone meanwhile will show as expired. If its taking a lot of time, do check the DNS server logs to see if there are any errors being logged.
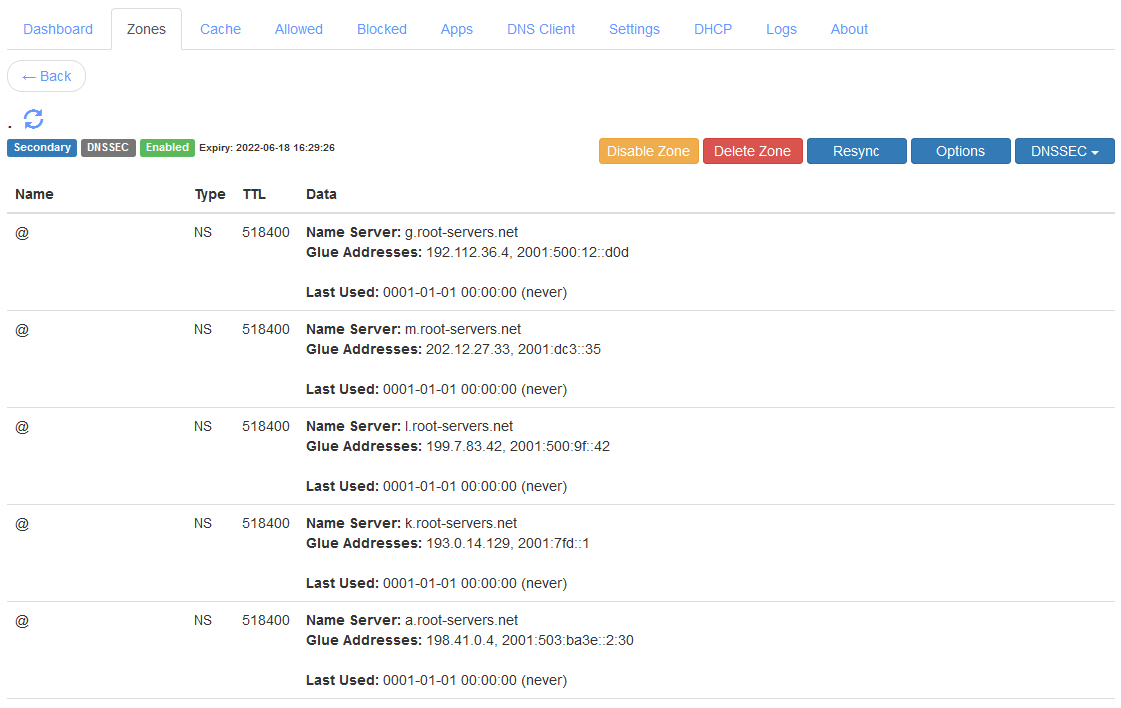
After the secondary zone is synced, you will see all the root zone records. There are thousands of records and it may take a couple of seconds for the DNS panel to list all of them. Here is what you should see in the DNS zone:
|
|
Local Secondary Root Zone |
Now, open the first instance web console at http://<server-ip-address>:5380/ and go to the Zones section. Click on the Add Zone button to create a Conditional Forwarder Zone for . as the zone name and with the Use "This Server" option enabled. Once the zone is created, click Add Record to add a record of NS type, with localhost as the Name Server, and 127.0.0.2 as the Glue Address. You can now delete the FWD record that you see. Once done, you should have the conditional forwarder zone config as shown below:

|
|
Local Static Stub Root Zone |
This NS record will now make the conditional forwarder zone act as a static stub zone such that it will now query the specified name server when performing recursive resolution.
In case you had decided to run the root server instance on another server, just use its domain name as the name server and it's IP address as the glue address for the NS record to complete the configuration.
References
If you have any queries do write in the comments section below or send an email to support@technitium.com.